If you have any questions please email m_brand@maxon.net.
Software: Camtasia (Windows) or Camtasia / ScreenFlow (Mac)
Microphone: USB Microphone - audio needs to average a -7db level
We’ve found that the relatively inexpensive Microsoft LifeChat LX-3000 provides good audio in quiet recording spaces.
Resolution: 1920 x 1080 (Ideal) or 1280 x 720 (Minimum)
Ratio: 16:9 (Standard)
Frame-rate: 15 - 30 fps.
In some cases (high motion situations, showing a final animation, etc) capture can be done at a higher frame rate. If you record at a higher frame rate be sure to adjust your export settings to match, otherwise you negate the effects of the higher capture rate.
Some authors have had difficulty recording at 1080P or 720P on MacBooks, especially those with Retina Displays. We recommend a App called “Quick Res” to set your screen to non-standard resolutions. It costs $4, but is well-worth the money for the added convenience.
Video Settings
Format: .mp4 or .mov
Codec: H.264
FPS: 30 fps.
If there is a lot of faster motion you will need to use higher values
Keyframes: Every 3 seconds (15 fps = keyframe every 45 frames)
Encoding Quality: Best
Quality: Between 85 - 95% (review output to watch for compression errors)
File Size: < 200mb (ideally)
Audio Settings
When setting the audio try to match these settings as close as possible, as incorrect settings will cause the uploads to fail.
Codec: MPEG 4 Low complexity ACC
Rate: 44.100kHZ
Bit Rate: 96kbits/s (Camtasia should set this automatically for you)
Fast Start: Enabled
Recording Notes
Try to cut out “umm"s, “ahhh"s, and dead air - if you are not too sure what to say for a certain section just talk through what you are doing.
Add the title card to the beginning of each part of the tutorial. It should be visible for 5 seconds.
Use zoom / pan effects to help direct the viewer’s attention.
Try to keep the length of each part to around 4-7 minutes. Longer is acceptable if there isn’t a logical break in the content, but much longer than that and users won’t be able to get the answer they need in a timely manner. Videos should be absolutely no longer than 10 minutes.
Keep your energy level up and consistent from beginning to end of each tutorial. Avoid recording a bunch of tutorials in a row without a break - if you’re feeling tired or bored so will your students.
Intros/Outros
At the beginning of each video, tell the listeners what you will be covering in this tutorial. Make sure you include your name and what tutorial series this tutorial is in.
Ex: Hello, this is Chris, and we will be continuing making a boat on the ocean. Today we will be covering how to create the waves.
At the end, recap what they have learned, and what they will be learning in the next tutorial.
Ex: This concludes how to make waves using xyz. The next tutorial we will cover how to put the scene together with the boat rolling over the waves.
Make sure you save 5 seconds for a title card to be placed, usually just the introduction will be long enough. You will be sent formatted title cards that you can place at the front of your videos. You will need to put title cards on the front of every video.
Procedure for Flubs
Stop moving your cursor
Pause for a couple beats.
Say a keyword, like “Rather” or “Rephrase” so you won’t miss the flub when you’re editing later.
Rephrase the thought from the beginning of the sentence
Calling out cross-platform keyboard shortcuts
Update File Format
Once you have created the .mov duplicate it and change the extension of the duplicate to .mp4 (If you skip this step to files will not populate to to the streaming network)
]]>Cineversity is an educational program sponsored by Maxon for the benefit of students and teachers of 3D modeling, textuing, lighting, animation and rendering. It focuses on bringing the widest variety of resources for learning Cinema 4D to users of the software. These include curriculum, tutorials, and other material that we hope will prove helpful to even the most frustrated of novices. In creating Cineversity, it is our goal to further enrich the 3D community by introducing future generations of professionals to the joys of 3D computer graphics in the least intimidating and most satisfying way possible.
If you have a license for Cinema 4D, you also have access to Cineversity premium content. The log-in you use for Cineversity is the same as your MyMaxon account.
No. As part of our subscription-based membership and to control piracy, you are not allowed to download any tutorial videos on the Cineversity site. Many tutorials have associated project files, which you are free to download and keep even if your membership has lapsed.
You can post your tutorial suggestions as a poll within the Tutorial Suggestions forum on our site. Keep in mind that our instructors are most likely to focus on tutorials that will have general appeal and fall within their areas of expertise.
Cineversity does offer one-on-one training, via direct connect which allows you to interact directly with one of our knowledgeable instructors via the internet. You’ll be able to follow along by viewing the instructor’s screen remotely. You’ll also have the opportunity to share your screen so the instructor can evaluate your progress and help you along. You can choose from one of our curriculum options or get training in the context of a current project. There is an additional fee for this service. You can learn more about Cineversity 1on1 by watching this video.
Email (training_us@maxon.net) to schedule your Cineversity 1on1 session.
On-site training is available through your local distributor or a Maxon authorized training partner.
If you have questions about your account or are experiencing technical difficulties with the website, you can use our online contact form to reach the appropriate parties.
If you are experiencing an issue with the content of a specific tutorial, click on the blue “Help with this Tutorial” button on the tutorial playback page. This allow you to post a new thread to our tutorial support forum where you can ask your question and get timely feedback from a Cineversity support representative or a member of the Cineversity community. If someone else has already asked a question about the tutorial, you’ll see their question and any responses while still having the opportunity to ask your own.
While project assistance is beyond the official scope of Cineversity support, there’s a good chance you’ll get a helpful response if you post your question to the Cineversity Q&A forum. If you need a guarantee of project assistance, email (training_us@maxon.net) or call Maxon US now (+1-877-ANIMATE) to schedule a Cineversity 1on1 session tailored to your needs.
]]>Open the Backend
Login to the Cineversity backend by going to: [If you’re an author and don’t know this, contact: m_brand@maxon.net ]
From the top bar select: Publish > Tutorials.
Update the Tutorial Description
Fill out the title.
Clean up the URL.
The URL will be generated automatically based on the title, double check that the URL has populated correctly, remove unwanted underscores and dashes, etc. The URL should be clean and readable.
Enter the long description. Try to be as detailed as possible about what is covered in the tutorial.
The search system on CV uses the title/short/long when it is finding videos, so the goal is to make the descriptions search friendly without just being a huge collection of keywords
Upload the Video
Toward the bottom you will find a field called “upload video files”
Click the little picture icon, this will open the upload dialog.
Click on the “Upload” tab in the dialog, this will allow you to upload multiple files.
Click on browse to locate the files and then upload to add them to our server. (make sure that you have changed the extension from .mov to .mp4)
Once the upload has completed you can select the file you wish to link to the tutorial.
When you have linked the video you can click the submit button to save the changes to the tutorial.
After you have linked the file go to the row of tabs along the top, don’t worry about the date, we will change that.
Categorize the Video
Categories should be selected, refer to the style guide for additional information on that - If you have questions please ask.
Make the Next Tutorial in the Series
To create the other tutorials go to the “edit” menu at the top and choose “tutorials”
this will display a list of tutorials on CV, you can use the filters to find the one you just created.
If you take a look on the right hand side you will see a button called “clone” clicking this will create a duplicate of the tutorial.
clicking the tutorial name will let you edit the cloned tutorial.
Update the relevant areas, title, URL, Short / long description, and categories.
To link a video click on the picture icon again to bring up the dialog, if you go to the browse tab you should see the video files you previously uploaded.
Project File Name
Videos
File_name_with_no_spaces_tutorial_01.mp4
Fully_rendered_finished_product.mp4
Pictures
Good_screenshot_of_final_product.png
Assets
download_save_files_for_tutorials_01.zip
For more information, please refer to: Style Guide
Again, if you have any questions please contact pgoski@maxon.net.
]]>import c4d,os # Main function def main(): if op.GetType() == 200000118: # Legacy Xref # Get the path fn = op[c4d.SCENEINSTANCE_FILENAME] path, fname = os.path.split(fn) # Loop through the directory fileList = os.listdir(path) for i,f in enumerate(fileList): # When we find the current file, get the next one if f == fname: op[c4d.SCENEINSTANCE_FILENAME] = os.path.join(path,fileList[i+1]) # Execute main() if __name__=='__main__': main()]]>
�
For more information on the Loft Generator object, please watch Athanasios Pozantzis’s series “Loft Generator Demystified”.
�
]]>The resource that I’d like to create for Cineversity is tentatively called CV-Boole Tools. It’s a series of command plugins for Cinema 4D that greatly simplify working with the Boole and SplineMask objects. It gives users an intuitive illustrator-style palette for combining 3D geometry or splines in interesting ways.
CV-Boole Tools Palette
Includes:
Union Selected
Subtract Last Selected
Intersect Selected
Without Selected (Similar to the boole “Without” feature)
Expand Object Group
The tool works with an arbitrary number of objects. Here are our splines before:
And here they are after a union:
Here you see the result of the intersect button:
And here you can get a sense of how complicated it would be to create this hierarchy without the use of this toolset:
Here’s an example of what can be easily be accomplished by using the boole tools in combination with the bevel tool:
And this is the hierarchy automatically generated by CV Boole Tools:
Write a brief (1-5 sentence) description of your proposed course. When you’re done, send an email to m_brand@maxon.net.
Step Two: Table of Contents
Write out an outline for your tutorial series. Each video should get it’s own line. Include some rough ideas on what you plan to put into the tutorial. When you’re done, send an email to m_brand@maxon.net.
CV-Boole 1.0: Tour (2 min)
CV-Boole: Download and Install (3 min)
Instructions on how to download and install the plugin
Setting up the icon palette
CV-Boole: Reference (~4 min)
An extensive overview of the key features and how to use them
Icons & Meaning (1 min)
Modes (1 min)
Boolean
Spline Mask
Connect
Keyboard Shortcuts (1 min)
Limitations (1 min)
Modeling an Ornament with Splines and CV-Boole (6 min)
- Not certain on the object yet, but a basic modeling tutorial showing off the use of CV-Boole with splines.
Modeling a USB Stick Cap with CV-Boole (Based on the C4D Reference Tutorial) (6 min)
- Modeling the top part of this object using CV-Boole
�
Step Three: Video Outline
Deadline: January 17th
�
Key Points:
[TITLE CARD] CV-Boole Tools are a collection of
[Plugin Pulldown] small plugins that greatly simplify the process of working with Booleans, Spline Masks, and Connect objects in Cinema 4D.
[Building a complex boolean hierarchy] Gone are the days of creating complex nested hierarchies by hand.
[Speed up Cap or Die footage] Instead, just select the elements you want to join and select one of the five modes: Add, Subtract, Intersect, Without, or Connect.
[Shot of Illustrator]Modeled after the Pathfinder palette in Adobe Illustrator
[Shot of Photoshop] and Photoshop’s selection shortcuts
[Speed up House spline footage] the workflow is instantly familiar to users of those applications.
Outro: Download CV-Boole Tools and speed up your boolean workflow today!
Short Description: Plugins that greatly simplify the process of working with Booleans, Spline Masks, and Connect objects.
Long Description: CV-Boole Tools are a collection of small plugins that greatly simplify the process of working with Booleans, Spline Masks, and Connect objects - especially when you are working with more than two objects. Its interface is modeled after the Pathfinder palette in Adobe Illustrator and it’s keyboard shortcuts are the same used for different selection modes in Adobe Photoshop - making the workflow instantly familiar to users of those applications.
�
Key Points:
CV-Boole Tools is a set of python plugins for Cinema 4D that greatly simplify the process of working with boolean objects.
You can download the plugin by clicking on the “Download” button to the left of this video.
Open up the downloaded .zip file, and copy it into your Cinema 4D plugins folder.
Restart Cinema 4D
To access the plugin you can go to Plugins > CV-Boole Tools
If you would like an icon palette that closely mimics the Pathfinder window in Adobe Illustrator, just open the .l4d file included in the download.
Dock the palette into your interface.
Save your layout.
Outro: Brief summary of the most important parts of the video.
Short Description: Download and install CV Boole-Tools, a set of Python plugins for CINEMA 4D that greatly simplify the process of working with boolean objects.
Long Description: Download and install CV Boole-Tools, a set of Python plugins for CINEMA 4D that greatly simplify the process of working with boolean objects. CV Boole Tools has been verified to work in all editions of Cinema 4D R15 (except Lite which does not support Python plugins).
�
Intro: This video will go point-by-point through all features of CV Boole Tools.
Key Points:
Icons & Meaning (1 min)
Union
Subtraction
Intersection
Without
Union with multiple Cubes
You can have as many objects selected as you would like
To easily expand the whole group ctrl-click on the plus sign next to the top-most object in the objects manager.
Adjusting the boole settings in the AM
Subtract with Cube & Sphere
Selection order matters!
Without using Cube & Sphere
Intersect with Splines
Select all splines
Run the intersect command
It doesn’t work!
Hit undo
Go to the Top View
Intersect
Explanation: The active viewport determines which plane is used for the splines.
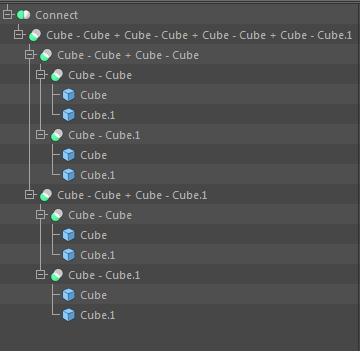
Connect Groups
When you select a single object that has children and choose Union, it will create a Connect object instead of a Boolean.
Note that this does not eliminate intersecting geometry, if you want to do that, you need to select all of the children individually and try Union again.
Keyboard Shortcuts (1 min)
If you would prefer, you can create any merge type you want by using the Union command with keyboard shortcuts:
Shift = Add
Ctrl / Alt = Subtract
Shift + Alt = Intersect
Ctrl + Alt = Without
Outro: CV-Boole Tools doesn’t do anything you can’t already accomplish using the Boole, Spline Mask, & Connect objects in Cinema 4D - but by either using the function-specific icons or a single icon in combination with keyboard shortcuts you can save yourself a lot of time.
Short Description: A comprehensive overview of CV-Boole Tools.
Long Description: A comprehensive overview of CV-Boole Tools including: CV-Boole Union / Add, CV-Boole Subtract, CV-Boole Intersect, CV-Boole Without, and CV-Boole Connect. Learn how to combine 3d primitives and 2D splines with a minimum of clicks.
�
Intro: In this video we’ll model a simple Christmas ornament in the shape of a house using CV-Boole Tools.
Key Points:
Because we’re working with splines I’m going to move to a 2D view.
Go to your front view.
Create a rectangle, this will be the body of the house
Create a triangle, this will become our roof
Let’s add a door:
Create a rectangle
Move it to the base
Make it editable and scale it down on x
Let’s create windows
Create another rectangle
Scale it down
Copy it to make a grid of four
How about a Chimney?
Rectangle
Another rectangle at the top
Create a hole for our ornament
Now it’s time to use CV Boole Tools
Add the roof and house together
Subtract the door
Connect the window pieces
Now subtract the windows from the house
Add the chimney pieces together
Subtract out a hole for the hanger
Outro: You can create complex shapes quite easily by combining a series of simple shapes using CV-Boole Tools.
Short Description: Learn how to model a plastic cut-out christmas ornament in the shape of a cartoon house using CV-Boole Tools.
Long Description: Learn how to model a plastic cut-out christmas ornament in the shape of a cartoon house. Tools used include: CV Boole Tools Union, Subtract, and Connect.
Intro: In this video, we will be modeling the cap from a rugged aluminum USB thumb drive using a series of boolean operations.
Key Points:
Rotate around the reference model and point out the major features.
Add a cylinder
Height: 100cm
Rounding: 10cm
Create a cube
Rotate it 45* on B.
Line it up to slice off the top.
Subtract the cube from the Cylinder.
This doesn’t give us what we want, we need a ridge still.
Hit undo.
Make the cube editable so we can scale it non uniformly.
Scale it down on Z.
Scale it all up.
Subtract the small cube from the larger cube.
Subtract this object from the Cylinder.
Now create the keyring hole.
Create a cylinder
Adjust the orientation to be +Z
Subtract the cylinder from the top-piece.
Let’s get rid of the excess polys on the bottom.
Create a cube
Move it down below the cut
Without command
Outro: In this video we used CV-Boole’s subtract command to model the complex planes and curves of this USB thumbdrive cap. We used the Without command to quickly remove excess polygons from our object, and the connect command to create a single object without excess points.
Short Description: In this video, we will be modeling the cap from a rugged aluminum USB thumb drive using a series of boolean operations.
Long Description: In this video we will use CV-Boole’s subtract command to model the complex planes and curves of a USB thumbdrive cap. We used the Without command to quickly remove excess polygons from our object, and the connect command to create a single object without excess points.
�
Intro: Brief introduction to what you’ll be covering in this particular video.
Key Points:
Outro: Brief summary of the most important parts of the video.
Short Description:
Long Description:
]]>CV-VRCam makes it easy to render Cinema 4D scenes as 360 degree Virtual Reality video. CV-VRCam works as a render effect Cinema 4D’s Standard and Physical Render Engine, and outputs Equirectangular, Omni-directional Stereo (stereo Equirectangular), or horizontal cubic strip maps.
For general usage, see the following Cineversity tutorials:
This mode renders a map in equirectangular format, which can be projected on a sphere for a 360 view. When rendered in stereo, the rays are adjusted to maintain the correct stereo effect to the left, right and back.
Choose this option for most VR video applications, including YouTube VR, Facebook and MilkVR
This mode renders a cubic map as a single horizontal strip, with 6 panes for monoscopic content and 12 panes for stereo content. The image is mapped onto a cube by the viewer. This format offers higher resolution and less distortion than equirectangular projection, but is less compatible especially for video applications.
Choose this option primarily for still images to be viewed on GearVR via Oculus 360 Photos or Orbx.
Note that visible seams may appear when rendering cubic maps with anti-aliasing or Physical Render, because Cinema 4D’s AA will smear pixels between cube faces.
To minimize this, we recommend the following anti-aliasing settings:
In many scenes, it’s possible and necessary to use higher AA settings. In our testing, Best AA can be used as long as the filter width does not exceed 0.5 (Sinc) or 1.0 (Cubic). The filter height can be set higher in order to achieve the desired level of anti-aliasing (since the seams are all horizontal, height blurring does not create visible seams).
Another effective solution is to render with minimal AA at twice the resolution (36864x3072) and scale down. This is the only option to eliminate visible seams when using Physical Render.
Renders a mono 360 image
Renders a stereo 360 image
Renders a mono 360 image based on a single eye and the specified eye separation. Can be used when combining renders later in a compositing pipeline
The interpupilary distance between the eyes for stereo effect. Average human IPD is 6.5 cm. This can be adjusted for desired audience (smaller for children), or to compensate for the scale of the scene.
This is the distance from the eyes to center of the neck, used in the cubic calculation
This option offers some adjustments to the calculation of cubic maps in order to minimize seam artifacts. In general, the Warp option is considered best, but the other options are provided for your experimentation in case they work better on specific scenes.
Individual options for pole merging at the top and bottom of the image. Pole merging reduces the stereo offset of the cameras towards the poles in order to minimize distortion.
No pole merging is performed. The stereo offset is used for the entire image.
The stereo offset is reduced in a linear fashion.
The stereo offset is reduced exponentially, creating a smoother transition.
The angle at which the pole merging effect should begin.
When using Exponential Merge mode, the exponent controls the falloff ratio of the pole merging effect.
This command adds preset render settings in the current C4D document which provide common output sizes and CV-VRCam options for popular VR formats.
This command merges a camera rig with cameras facing each cubic direction (forward, back, left, right, up, down). Each camera has a 90deg FOV. Currently the rig itself is simply for utility while designing your VR environment and is not necessary for rendering.
Network rendering is extremely helpful due to the large output size of VR imagery. CV-VRCam fully supports Cinema 4D’s Team Render solution and command-line rendering. Simply install CV-VRCam within the plugins folder on all render nodes.
For CV-VRCam support, please post in the Cineversity Toolbox Forums
Below are some examples based on our research and testing:
Because YouTube re-compresses uploaded content in multiple 16:9 resolutions with a max supported resolution of 3840x2160, best results are achieved by always using all the pixels YouTube will allow.
All 360 and VR video for YouTube must have metadata injected in the final mp4 using the provided tool.
More Information: YouTube Help: Uploading VR Video
To use Cinema 4D from the command line, Cinema 4D must be licensed on the machine, or you need to reference a C4D License Server with valid command line licenses.
On OS X, execute command line options via the terminal. You must execute the actual Cinema 4D app within the application package. An easy way to do this is right-click the application, choose Show Package Contents, and navigate to Contents/MacOS. Drag the Cinema 4D application from within this folder ontol the terminal window and the path will be entered at the cursor position.
/Applications/MAXON/CINEMA\ 4D\ R16/CINEMA\ 4D.app/Contents/MacOS/CINEMA\ 4D -nogui
Command Line options can be added directly within a shortcut, or executed within a command prompt window.
Prior to R16, prefix the command with:
start /b /wait "parentconsole"
this will output information from Cinema 4D within the command window.
With R16 and later, simply use the Commandline executable, which always outputs Cinema 4D information to the console.
As of Release 16, a Commandline executable is installed beside the main Cinema 4D executable.
The Commandline executable is identical to Cinema 4D except for the following:
-debug | >= R15 | On CINEMA 4D startup a debug output console will open. | |
-g_alloc=debug | >= R15 | Enables the debug memory management (and debug output console). | |
-parallel | PC only, start CINEMA 4D as an additional instance (handy with Bugslife). | ||
-title titletext | the titletext will be shown as the title of the application (10.012 - 10.506: Titletext can be any text. It will be displayed as an extension of the application’s windows title.) | ||
-help | display command line options | ||
help | >= R16 | display help of the base system. With help=dev, help=plugin, help=extension, help=impl, help=all you can output certain categories | |
g_logfile=[string] | >= R16 | create a logfile for all console output | |
g_threadCount=[0..256] | >= R16 | set a program-wide thread count. The number can be higher than the actual number of cores. A value of 0 will utilize the real number of cores | |
-server | <R16 | start CINEMA 4D as a NET Render server (due to changes in the resources this only works with Beta Versions or Net Server installations) (R15 does not have server functionality) |
|
-client | <R16 | start CINEMA 4D as a NET or TR Render client (due to changes in the resources this only works with Beta Versions or Net Client installations) | |
-homedir directoryname | <R16 | forces the use of the specified directory as home directory for save / load as well as preferences | |
-g_prefspath=mydirectory | >=R16 | forces the use of the specified directory as home directory for save / load as well as preferences. Use quotes around the whole term if there is a space in the path | |
-noopengl | disable openGL | ||
-nogui | start CINEMA 4D without a gui. This parameter needs to be the first in the list of parameters. | ||
-layout filename | Replace filename with a full path and file to override the default layout on startup | ||
-crashtest | simulate a crash and generate an error log for support purposes | ||
-nocrashhandler | supress use of the application’s crashhandler | ||
-render filename | Replace filename with a CINEMA 4D project file to render. You must include the full path to the file. If you don’t specify additional flags, the render settings saved with the file will be used. | ||
-frame from [to [step]] | Replace from and to with start and end frame numbers to override the file’s render settings. If only one value is given, a single frame is rendered. If a step value is given, every nth frame will be rendered. | ||
-oimage imagename | Replace imagename with a full path to override the save path stored in the file. The frame number will be automatically appended for sequenced renders. | ||
-omultipass imagename | Replace imagename with a full path to override the multipass save path stored in the file. The frame number and pass name will be automatically appended for sequenced renders. | ||
-oformat imageformat | Replace imageformat with TIFF, TGA, BMP, IFF, JPG, PICT, PSD, RLA, RPF, B3D to override the save format stored in the project file. | ||
-oresolution width height | Replace width and height with the desired pixel resolution to override the render resolution stored in the project file. | ||
-threads threadcnt | Replace threadcnt with the desired number of render threads. A value of 0 automatically uses the optimal thread count for the system. Any other number specifies the exact number of threads to use. | ||
-bench | <R16 | Preload textures before rendering for accurate timing—used for benchmarking purposes | |
-license [ip [port]] | Can be used instead of a license.ini to connect to a specified license server | ||
|
-oglversion=xxx | |
Force a specific OpenGL version. xxx must bi 100 * major version + minor version, e.g. 210 |
|
-oglmultithreading=x | |
enable or disable OpenGL multithreading. (x=0: unchanged, x=1: disable, x=2: enable) nVidia only |
To open multiple instances of Cinema 4D, just add “-parallel”
Windows:
"C:\Program Files\MAXON\Cinema 4D R16\Cinema 4D.exe" -parallel
Mac:
/Applications/MAXON/Cinema\ 4D\ R16/Cinema\ 4D/Contents/MacOS/Cinema\ 4D -parallel
Basic command-line rendering:
Windows:
"C:\Program Files\MAXON\Cinema 4D R16\Commandline.exe" %userprofile%\Desktop\test.c4d -frame 0 0 -oimage %userprofile%\Desktop\test -omultipass %userprofile%\Desktop\test_mp -oformat TIFF
Mac:
/Applications/MAXON/Cinema\ 4D\ R16/Commandline/Contents/MacOS/Commandline -render ~/Desktop/test.c4d -frame 0 0 -oimage ~/Desktop/test -omultipass ~/Desktop/test_mp -oformat TIFF
Cinema 4D’s C++ and Python APIs allow plugin developers to add more options to the command line by catching the C4DPL_COMMANDLINEARGS message and reading the arguments in argv. Arguments built in to Cinema 4D are handled prior to this message and their behavior cannot be overriden.
The source for Cinema 4D’s native command line rendering is available within the cinema4dsdk plugin examples, within your Cinema 4D application directory in /plugins/cinema4dsdk/source/other/commandlinerender.cpp
For more information on Cinema 4D API and plugin development, visit developers.maxon.net
]]>Click on the “<>” arrow bar between the playlist and the Video in order to maximize the size of your video while playing.?
Play your video in Full-Screen mode in order to maximize the amount of space your video takes up.
Play/Pause by pressing the Space bar.
Go back a few seconds by using the Left Arrow
Skip ahead by using the right arrow
�
Open the video you want to watch in Cineversity
Open the associated project files in Cinema 4D
Make the video fullscreen in your browser
Press Space Bar to start playing the video
After watching a section, press Space Bar to pause playback
Switch to Cinema 4D by pressing Cmd+Tab (Mac) or Alt+Tab (Win)
Repeat the actions you saw in the video
Switch back to your browser by pressing Cmd+Tab (Mac) or Alt+Tab (Win)
Press Space Bar to continue watching the video.
�
On your secondary monitor, open the video you want to watch in Cineversity
On your primary monitor, open the associated project files in Cinema 4D
Make the video fullscreen in your browser
Press Space Bar to start playing the video
After watching a section, press Space Bar to pause playback
Switch to Cinema 4D by pressing Cmd+Tab (Mac) or Alt+Tab (Win)
Repeat the actions you saw in the video
Switch back to your browser by pressing Cmd+Tab (Mac) or Alt+Tab (Win)
Press Space Bar to continue watching the video.
�
On your laptop, open the video you want to watch in Cineversity
On your desktop, open the associated project files in Cinema 4D
Make the video fullscreen on your laptop
Press Space Bar to start playing the video
After watching a section, press Space Bar to pause playback
On your desktop, repeat the actions you saw in the video
On your laptop, Press Space Bar to continue watching the video.
]]>