New in Cinema 4D R19: Rig and Animate Characters with Improved Weighting and Pose Space Deformation
Share this video
This video starts with an overview of the significant improvements to the weighting tools and workflows in Cinema 4D R19. That latter half walks you through the process of sculpting a Pose Space Deformation (PSD) so that you can fix pinching and overlap and create the appearance of muscles under the surface of your character’s skin.
Transcript
Cinema 4D Release 19 features several new enhancements to
improve your character rigging workflow. From new and improved correctional morphs
and weights mirroring, to improving the weights manager workflow,
Release 19 will help you rig faster and with better deformations from start to
finish. In previous versions of Cinema 4D, if you wanted to bind,
say, all of these sunglasses' meshes to the same joint, like this head joint,
it wouldn't work properly. You'd instead have to run the Bind command for each
mesh, because meshes were included as influence objects. However,
in Release 19, you can now select multiple meshes and whatever joints you wish to
bind them to, and run the Bind command successfully. You'll see that when you do
that, each mesh will be given a skin deformer, as well as a weight tag filled
with only the joints that you have selected, and not any meshes.
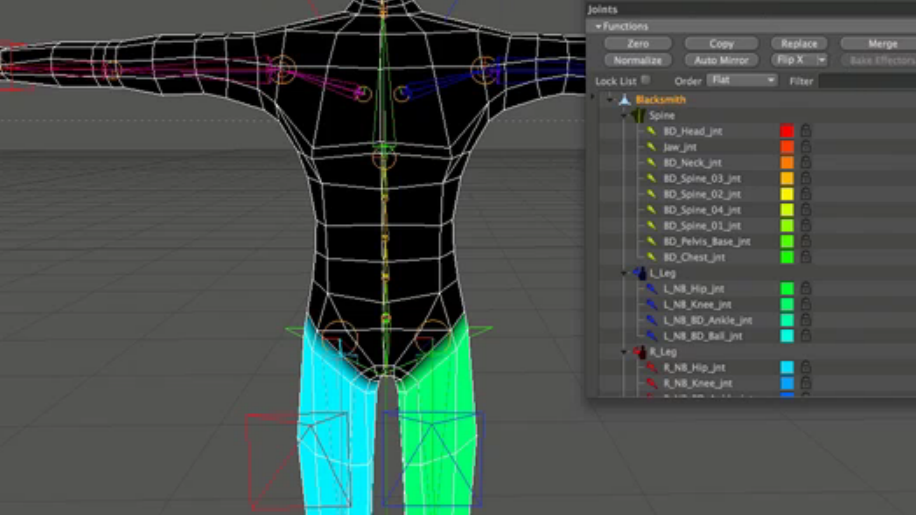
Once you've bound your character, you can now start painting your weights.
In Release 19, the weight tool has gotten some updates. The first thing you'll
notice is that there's no longer a joint list in there. You can now very easily
select your influences just by right-clicking on your mesh. This will
bring up a pop-up menu that will show you whatever influence you have selected, as
well as all of the influences that are available on a given point.
You can see by switching to just the chest joint here, that is all that's selected,
and I can begin painting it. You can also hold down SHIFT to select multiple
influences and paint on them simultaneously.
Another handy feature in Release 19 is the ability to access the dropper mode using a
shortcut. If you wanted to sample the weight of your selected influence at a
particular point, you used to have to switch to this dropper mode and then click
somewhere. And in doing so you'll notice that your strength would adjust.
In Release 19, you can now access the dropper from the weight tool by pressing
CTRL+SHIFT. You can see now that my icon has changed to the dropper mode and if I
were to click somewhere on my mesh, that my strength adjusts to this new value.
So, you can very quickly and easily sample weights on your mesh.
The weights manager has also seen some new improvements in Release 19.
First, under the Joint Filters menu, you can change how your joints are filtered,
as well as what weight tags are displayed in your joints list.
By default, you'll only see weight tags that you have selected,
but if you were to turn off this option here, I now have access to all the weight
tags within my scene. The Weights tab has also seen some improvements into its
filtering mechanisms that allow you to filter out joints and weights based on a
certain set of criteria you decide. You also have the ability to now use multiple
weights managers, so that you can have side-by-side displays of your weights as
well as your joints list and its commands, if that's what you choose.
There's also now options to turn on or off the Mouse HUD that displays the weights,
as well as changing the color and the transparency of it.
Cinema 4D's weight mirroring algorithm has been completely rewritten for Release 19.
Now it's much easier and simpler to quickly get a good, clean mirroring of
your weights across your character. In this example, I have a shirt that's only
got weights on one half of it. I can right-click, choose Select All,
to select all my influences that I want to mirror, and I simply say, Mirror + to -
and in doing so, it automatically mirrors everything over from left to right.
The other great thing is that this can work on meshes that are not topologically
symmetrical. For instance, these pants have weights on half of it as well,
but if we were to look at the topology, you can see that there are cuts kind of
all over, random, really bad-looking geometry and it's not symmetrical.
The point order is different on one side versus the other and they just don't match
up 100%. However, with Cinema 4D Release 19's new mirroring algorithm,
that doesn't matter. I simply click the mirror button and it will automatically
mirror across. No muss, no fuss.
Once you've finished painting your weights, you can push your character's
deformations even further using Release 19's new pose-based deformation morphs,
or PSD morphs. PSDs allow you to sculpt corrective shapes in a current pose.
For instance, if I were to turn off this pose morph tag real quick,
you can see that we're getting a bit of crunching happening when we bend the elbow
and we're not going to really be able to resolve all of that with just joint
weights. However, if I turn on my pose morph, what you'll see is that,
as we bend the arm, we're able to get nice, cleaner deformations as well as even
simulate some levels of anatomy with a bit of a bicep bulge here.
This is all being driven with just a single shape that's connected to the
rotation of my elbow. So, it's super simple and super easy to immediately
improve upon your deformations of your character.
Another example is to check out the head. If I turn off this pose morph tag,
when I rotate the head, and this is easier to see when I turn off the textures,
you can see that our joint weights are kind of limited to only a few spans.
And that's to prevent it from kicking out all this weight when you bend it forward
and backwards. So, we're getting kind of a sharp fall-off here.
However, if I turn on my pose morph, you can see we're able to really allow the
pose to kind of interpolate down the neck and even simulate a little bit of muscle
anatomy here. So, if I were to rotate this, you can see that we're having that
muscle engage. We're also cleaning up the deformations along these spans and
dispersing it further down the neck. So, you can see we're just taking already
pretty good weights and improving upon them even further.
Let's take a look at how we can create PSDs. We're going to create a corrective
shape for our right elbow here. So, to start, I'm going to pose my character
where I want it to have that shape. I'm going to do that, say,
negative 80. And I'm going to select my pose morph tag, jump into the Edit menu,
and click Add Pose. Now, to really understand what's going on with PSDs,
I'm going to leave this in relative mode and try to adjust my points of my
character here. So, if I've got this point selected, and if I click and drag up,
you'll notice that the point itself isn't actually going up. It's kind of going off
to the left a bit. And that's because in this pose, when using relative,
it's not taking in the skin deformer's deformation into account.
So, it's not a one-to-one relationship. So, if you were to try to sculpt in this
pose using Relative Mode, you'd have points kind of flying all over in weird
ways. So, what you can do is just switch this to Correctional PSD,
and you can see now I'm getting a one-to-one relationship here.
That's because it's allowing me to pose these points. Post Deformers,
you can see, it turns it on automatically here. And now I can use any of Cinema's
tools, like the Brush tool for instance, and I will just kind of smooth this out
real quick and dirty-like, just to get us cleaner-looking deformations.
You know, obviously you would want to take your time more to sculpt something a
little bit better, but I'm just doing this for a demo, so what I'll do is I'll just
bulge it out like so. And that's basically it, right?
You can do whatever you have to do to get your shape, switch to animate mode,
and now watch as I take my controller and bend it in and out of this pose.
You'll see that the pose will fire on and off automatically. Now,
notice how it's automatically firing. We didn't have to set up any Xpresso.
That's because the morph tag has this PSD section now, which allows you to enable
this auto-weighting for any PSD poses and there are three options here.
You can auto-orient, auto-twist and auto-position points. So, if you're
rotating on, say, the X- or Y-axes, you would turn on auto-orient.
If you were trying to do a twist along, say, the Z, you could turn on auto-twist.
And if your joints were being positioned instead of rotated, you could turn this
on. But automatically, with this auto-weighting,
it will fire, and you could see that the average
output from these three values here, it changes as I go
in and out of my pose. If you don't want this, you can just turn it off and you'll
see that your pose will be firing at all times, just like in the past and you could
animate it manually yourself or through Xpresso. So, it's super easy and super
quick to set up PSDs. It's easy to see how with these new tools and workflows in
Release 19, will enable you to create better-looking character deformations.
Be sure to check out Cineversity for all of our quick-start videos,
and quick-tip videos, and all the reference videos coming out in the coming
months for Release 19. You'll be able to get up to speed and running quickly with
all the new features of Cinema 4D Release 19.
Cinema 4D Release 19の新機能として、 キャラクターリギングワークフローに関する
いくつかの改善が行われました。 新しく追加された補正モーフと
ウェイトのミラーリング、 ウェイトマネージャのワークフローの向上があります。
Release 19では、リグのスピードアップと 変形の開始と終了の状態がよくなりました。
以前のバージョンのCinema 4Dでは、
サングラスのメッシュを頭のジョイントに バインドしようとしても、
うまく動作しませんでした。 バインドのコマンドを別々に行う必要がありました。
というのも、影響するオブジェクトに メッシュまで含まれてしまうからです。
しかし、Release 19では、複数のメッシュを選択して バインドコマンドを実行すれば
どんなジョイントでもバインドされます。 ご覧いただくとわかりますが、
各メッシュにスキンデフォーマが適用され、 ウェイトタグも選択したジョイントのみ適用され、
他のメッシュは含まれていません。
キャラクタをバインドすると、 ウェイトのペイントが行えます。
Release 19ではウェイトツールが アップデートされました。
まずは、ジョイントリストがないことに お気づきになるかと思います。
メッシュを右クリックすることで、 影響しているジョイントが簡単に選択できます。
ポップアップメニューに影響しているものが 表示されるので、選択できます。
ポイントに影響しているものも選択できます。
胸のジョイントに切り替えると 全て選択されるので、
ペイントを始められます。Shiftキーを押すと
複数のジョイントを選択して自動にペイントできます。
Release 19のもう一つの便利な機能として、 ショートカットでスポイトモードに切り替えできます。
特定のポイントから選択したジョイントから ウェイトを抽出したい場合
スポイトモードに切り替えて、 クリックする必要があり、
それを行ってから、 強度を調整する必要がありました。
Release 19では、ウェイトツールでCTRL+SHIFTを押せば、 スポイトに切り替えられます。
アイコンがスポイトモードに切り替わったのがわかります。
メッシュをクリックすれば、強度の調整を新しくできます。
つまり、メッシュのウェイトを素早く簡単に抽出できます。
ウェイトマネージャも、Release 19になって いくつか改善されています。
ジョイントフィルタメニューから ジョイントリストで内で、
ジョイントをフィルタ方法の変更から どのウェイトタグを表示するまで指定できます。
デフォルトでは、選択したウェイトタグのみ表示されます。
このオプションをオフにすれば、 シーンにある全てのウェイトタグにアクセスできます。
ウェイトタブのフィルタ機能も改善されており、
自分で設定した基準に合わせて、 ジョイントやウェイトのフィルタが行えます。
また、ウェイトマネージャを複数開くこともできます。
複数のジョイントリストに好きなウェイトや ジョイントを横に並べて
好きなものを選べます。
ウェイトを表示するマウスのオーバーの HUDのオンオフや
アルファ(透明度)や色を変更する オプションが追加しました。
Cinema 4Dのウェイトのミラーリングの アルゴリズムがRelease 19で一新されました。
より簡単でシンプルにすばやく キュラクターのウェイトを
良好でクリーンなミラーリングができます。 ここにウェイトが半分だけ設定された
シャツがあります。 右クリックで全てを選択して、
選択したすべてのジョイントに対して ミラーリングを「ミラー +から-」を選びます。
これで、全て自動的に左から右に ミラーリングされます。
さらに素晴らしいのが、メッシュのトポロジーは 対称である必要はありません。
たとえば、このズボンは半分だけ ウェイト設定されていますが、
トポロジーを見てみると、 いくつかカットされた跡がランダムにあり、
ジオメトリのトポロジーは悪い状態で、 対称ではありません。
ポイントの順番も反対側と 完全には一致していません。
しかし、Cinema 4D Release 19の新しい ミラーリングアルゴリズムなら、
気にすることはありません。 ミラーリングボタンを押すだけで、
自動的にミラーリングされ、 おかしな結果に悩むことはありません。
ウェイトのペイントが終わったら、 キャラクターの変形を
Release 19の新しいPSD(ポーズの空間変形) モーフを使って進めましょう。
PSDは、現在のポーズに合わせて、 形状を修正をできます。
たとえば、このポーズモーフタグをオフにしてみましょう。
肘を曲げた時に少しめり込んでいるのがわかります。
しかも、この問題はジョイントのウェイトだけで 解決することができません。
しかし、ポーズモーフを有効にしてみると、 どうなるかわかると思います。
腕を曲げても、おかしくところはなく きれいに変形されており、
上腕二頭筋のシミュレーションもできています。
ヒジの回転に連動しているは、 一つのモーフ形状だけです。
非常にシンプルで簡単なので、
キャラクターの変形をすぐに改善することができます。
もう一つの例が、頭部です。 ポーズモーフタグをオフにして
頭を回転させてみましょう。 わかりやすくテクスチャをオフにします。
ジョイントのウェイトは、一定の範囲で 制限されているのがわかります。
前後に曲げた時に全てのこのウェイトから 外れることを防ぎます。
そのため、はっきりとした減衰の区切りが 見えてしまいます。
しかし、ポーズモーフをオンにして見ると 首にかけての変形が
非常に滑らかになっていて、 胸鎖乳突筋がシミュレートできています。
回転してみると筋肉が動いているように見えます。
首の境目の部分も分散され、きれいに変形しています。
お話ししたようにウェイトも良くなり、
さらに、その他の部分も良くなりました。
それでは PSDをどのように作成するか、 実際見てみましょう。
右肘を修正してみましょう。 まずは、形状を設定するために
キャラクターにポーズを取らせます。 設定としては、-80°回転させます。
ポーズモーフタグを選択し、 編集モードにします。
それからポーズを追加ボタンを押します。 PSDが何をやっているかを理解してもらうため、
相対モードで、キャラクターのポイントを修正してみます。
ポイントを選択して、上にドラッグすると
ポイントの移動方向が上ではなく、
ズレて移動しています。 なぜなら、このポーズの相対方向がこの向きで
スキンデフォーマの変形が考慮されていないためです。
一対一で連動していないので、 相対モードでこのポーズの形状を変更をすると
ポイントはあちこちに移動して おかしなことになります。
ここで、補正PSDに切り替えます。
そうすると、操作と実際の移動が 連動しているのがわかります。
これはポーズとポイントの位置関係が 考慮されているためです。
デフォーマの後が自動で有効になっています。 ここではどんなCinema 4Dのツールでも使えます。
たとえば、ブラシツールを使って、 変形がおかしなところサッとスムーズにしていきます。
これで自然な変形に仕上げていきます。
本来なら変形状態をきちんと仕上げていくのですが、
これはデモンストレーションですので、
とりあえず膨らませるくらいにしておきましょう。 こんな感じでいいですかね?
気に入った形状になったら、 アニメートモードに切り替えます。
そして、コントローラを使って曲げてみて、 ポーズの動きを確認します。
ご覧いただいた通り、ポーズは自動的に変化しています。
どうやって自動で変形させているのか見てみましょう。 XPressoの設定は必要ありません。
モーフタグにPSD設定があるので、 PSDのポーズに合わせて
ウェイトが自動的に設定されます。 これには3つの設定があり、
自動で向き方向、ツイスト、ポイントの位置を設定できます。
XもしくはY軸を回転させる場合は、 自動方向合成がオンにします。
ツイストつまりZ軸を回転させる場合は、 自動ツイスト合成をオンにします。
また、回転の代わりにジョイントの位置が変える場合は、 自動位置合成をオンにします。
ただ、この自動ウェイトが自動的に適用されますが、
この3つの値の平均が出力され
ポーズの値として適用されます。
ポーズの強度を自動にしたくない場合は、
設定をオフにすれば、 常にポーズが適用された状態になるので、
従来通りの方法でアニメーションがさせたり、 XPressoでコントロールできます。
PSDを設定すれば、非常に簡単にすばやく行えます。 Release 19の新しいツールとワークフローがあれば、
より仕上がりの良いキャラクターの変形が作成できます。
ぜひ、他のCineversityのクイックスタートビデオや
Quick-Tipもご覧ください。他の参考ビデオも Release 19のリリース後に提供される予定です。
作業がスピードアップするので、
ぜひ、Cinema 4D Release 19の新機能に慣れてください。