Canyon Scene Reconstruction: Using Scene Reconstruction to Render a FUI / AR Wireframe
Share this video
In this video, you’ll learn how to transform geometry generated from a footage plate via Scene Reconstruction into a low-poly wireframe for Augmented Reality of Fictional User Interface visual effects. We’ll use C4D’s Polygon Reduction generator and MoGraph Cloner to create the wireframe mesh and animate the mesh onto the screen using a MoGraph effector.
Transcript
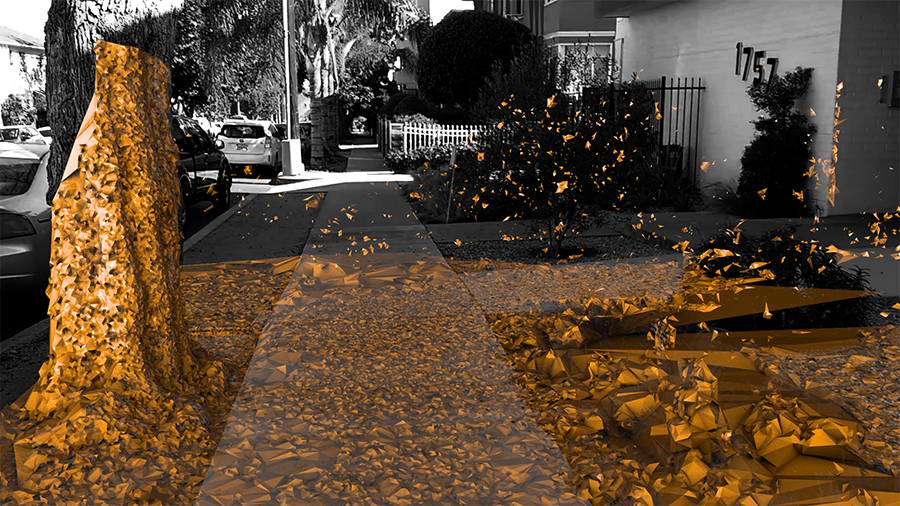
In this video, we're going to take this Scene Reconstruction Mesh that's been
generated from video footage, and use that to generate a lower polygon
wireframe representation of the landscape. And this could be useful for an augmented
reality marketing campaign or maybe some sort of a fantasy user interface for film.
Before we jump into that, I am going to first do a quick bit of scene cleanup.
I'm going to jump into the Layers Panel and create a new layer
by double-clicking. I'm going to name that layer Dynamics. And we'll just select the
Cloner and Sphere, as well as the Random Effector, that have to do with the
dynamics simulation that we did in the last video, and I'm going to drag those
over the layer so that we can assign that layer. Now, we can go ahead and hide all
of that and also remove it from all of the calculations, so that it won't slow
down our progress in this next section. Now, obviously when we're creating a
wireframe representation of this mesh, we're not going to want this level
of polygon density. So the first thing that we're going to need to do is reduce
the polygons. And for that, we'll use the polygon reduction generator
that was introduced in release 19. We're going to want to do this on a copy
of the reconstructed mesh. So I'm going to go ahead and Ctrl+drag
here to create a copy. I'm going to remove the
smoothing deformer, and I'm also going to remove all of these tags except for the
vertex color tag. We might want that a little bit later.
Now, with the mesh selected, I'm going to create a new polygon
reduction generator. And, again, I'm going to hold down the Alt key when I
do that and it's going to automatically create the generator as a parent of the
mesh so that it's immediately applied. We'll hide the original mesh that we've
been working with so that we can focus on the polygon reduction version.
And here, we can see that polygon reduction mesh or that polyreduce mesh.
If we go in here into the Attributes panel, you can see that we can adjust the
reduction strength. And so, we can go down with this and get more of the mesh
back or we can go up with it and get a much lighter mesh. And that's the goal
here. We're going to go to something like 98% or 99% in order to get just sort
of the highlights of the features that are involved in this landscape.
Now that we have a much lighter mesh, we can use any number of techniques
to render this as a wireframe. You can use the Cel Render or
Sketch and Toon. A Lot of people will go to the Atom Array, and again,
if we hold down the Alt key as we create the Atom Array, it'll automatically be
created as a parent. And you can see that what the Atom Array does
is create a cylinder on every edge. So that's giving us a nice
wireframe representation. I'm going to show you a technique that
is maybe, perhaps, a little bit less well-known but I think provides a little
bit more flexibility than the Atom Array, and that is using the Cloner Object.
So, what we're going to do is first create a cylinder, and this is the cylinder
that's going to be added on each edge. For that reason, we don't want to use
36 rotation segments. I'm, in fact, going to be fine with just four.
You might, if you want this cylinder to look more rounded, you might want to go
to something like eight. We're going to want to make this
fairly thin. So, let's go ahead and set a radius of 10 and the height of 100.
And of course, we can continue to tweak that down the road if we find
it necessary. Next, we're going to go ahead and create a Cloner Object.
And again, we're going to create it as a parent of that cylinder,
so it uses the cylinder as the object to be cloned. We do that by holding on the
ALT key when we create the cloner. And down here in the Mode,
we want to go ahead and switch that to Object, because we want to clone
onto our mesh. So, we'll drag the polyreduce mesh down into the object
link field, and you'll see that now we get cylinders at every vertex point of our
Polygon Reduced Mesh. We actually want these cylinders to appear
along the edges, so we'll go to the Distribution option here and change it
to Edge. And we also want to scale those objects along the edge,
and if we set this all the way up to 100%, you'll see that the cylinders are scaled
to the same length as each edge. And now, we basically have a same wireframe that we
would get with the Atom Array, just without the spheres for each point.
But the real benefit of this workflow is that now we can effect the wireframe very
easily with effectors. So, with the cloner selected,
I'm going to go ahead and create a Plain Effector. And of course,
because the cloner was selected, it automatically added that effector
within the Cloners Effectors tab. In the Plain Effector,
I'm going to go ahead and turn off the Position Mode, and instead,
we'll use Scale, and we'll go to Uniform Scale and scale this to minus one.
Now, you can see that the cylinders themselves disappeared.
And to make that a little bit more obvious, we'll go ahead and hide the
original mesh. But of course, now we can adjust the scale of the
cylinders using the effector's strength. So if we reduce this strength to zero,
we get all of those cylinders back. So, instead of growing this all at once
using the strength, let's use a falloff, so that we can grow it through 3D space.
So, we'll go to the Falloff tab and change the shape to Linear.
Now you can see this representation of the linear falloff down here in the lower
portion of the screen. I'm going to go ahead and move that up so
it's a little bit more obvious where it is. And you can see that as I move that
through space, it actually is growing the wireframe. I want to actually scale this
up so that the falloff distance is a little bit bigger. So we'll set the size
Z to 500. And I'm going to also increase the falloff all the way to 100%.
Now, we'll get a little bit more time for each of those edges to animate on.
So, now all we need to do is animate this falloff through the points.
So we'll go ahead and go under the Coordinates tab. I'm going to set a
keyframe by clicking this dot next to the position Z element, and we'll move
forward in time. And we'll just increase the position Z to something
like 4,000 so that we can see the axis again. And we'll drag the axis
further down so that it's as far as it needs to go, and we'll keyframe position
Z again. Now we get an effect that looks something like this. But of course,
we want to wipe the wireframe on rather than wiping it off. So, we'll go into the
Effector in the Falloff tab and check the Invert checkbox.
And now, we're getting a wireframe that looks like this. Now, the one thing that
I would like to do though is rather than having each edge grow from its
center, I'd like it to grow from a point, and that's going to give us a little bit
more of an organic growth appearance. And to do that, all we need to do is move
the axis of the cylinder. So we'll select the cylinder here and an easy
way to move the axis while still keeping the cylinder parametric is
to simply put it underneath a null object. So I'm going to hit Alt+G, which is
going to create a null, and we'll go back to the cylinder here and just move it,
on Y, up half of its height. So, the cylinder is 100 units tall.
So we'll just go ahead and set the position Y to 50.
Now, you'll see that everything gets a little bit off kilter and that's because
we need to jump back up to the Cloner and adjust the offset here for the edge
clone. And we can just see if 0% or 100% is the right way to go and it's obvious
now, here, that 100% is the direction we need to go with that. And now, you'll see
that things are going to grow out from a point. And in fact, I think I'm
going to reduce the Falloff a little bit so that it looks little bit more organic
like one is building to the next. So let's drop this size here down to 250.
Now, each of the edges is going to grow a little bit faster. And you can see how now
they look like they're building up from one another a little bit more.
Now, if we render, we get something that looks like this and, of course,
we need to texture that. I already have a material here where I
basically disabled all of the channels, except for luminance,
and made the material itself cyan, because I think that's the only color
wireframe's coming. We'll go and apply that to the cloner. And the next thing
that we want to do is actually hide the edges that should be hidden because
there's geometry there. For that, we'll go ahead and just bring our original
scene mesh back in. And if we render now, you'll see that we're getting that hiding
but we're also losing some of our new mesh because it's now embedded in the mesh,
because the polygon reduction process actually caused us to lose a little bit
of volume. The way I'm going to solve that is by moving each of the polygons of the
polygon reduced mesh outward in the direction of its normal.
And I could do this by making the polygon reduction mesh editable and moving the
normals manually using the modeling tools. Instead, I'm going to use a plugin that's
available from the MAXON Labs website. And the link will be in the description
of this tutorial. It's called Py-ParametricTools. What it allows you
to do is perform a normal move via a generator rather than using the
modeling tools. So we'll go ahead and hold down the Alt key as we create this normal
move generator. You'll see it's created as a parent, which means that it's going
to act on the poly reduced mesh. We need to relink the cloner to the
generator that we just created. So we'll drag it into the object field.
And you can see the whole mesh sort of move outward there. We can go back
into this normal move generator and adjust the move parameter, and you can see that
we can go ahead and increase this as much as we need to to get the mesh above the
original scene reconstructed mesh. Looks like something like that will work
pretty well. Now, if we render, you'll see that we get something that
looks like this. Now, we are getting shadows from the wireframe
on the original mesh. And that might not be something you're
looking for. It's not something I'm looking for. So, what we'll do is
right-click on the cloner here, go into Cinema4D tags, Compositing,
and turn off the Cast Shadows option. Now, we get something that looks like this.
The mesh, itself, looks a little bit too thick, so we'll go back into the
cylinder and reduce the radius. And, of course, the nice thing is that
all of these can be edited at any time. So now we get something that looks
like this. And what I might want to do is represent this without the actual color
from the mesh, and for that, we'll go into the material that actually
includes the video footage. And I can just change this Mix Strength
down to 0%, and I'm going to change the value to 0% here as well so it's black.
And now, if we render, you can see that we've got our wireframe
mesh just on a black background. Now, of course, if I wanted to fade the actual
video footage in, I could simply animate this Mix Strength. So let's actually
do that. Let's fade it in, starting here, at maybe frame 100.
And I'll set a keyframe, again, just by clicking the dot.
We'll come out here to frame 160, I guess, and we will set the Mix Strength
up to 100% and click again to set another keyframe. And now, you can see that we get
an animation that looks like this. So, this is another great effect that you
can achieve once you have a reconstructed mesh from actual video footage.
In the next tutorial, we're going to look at another technique
that will actually allow you to render the point cloud that was generated
from the scene reconstruction.