Voronoi Fracture Reference: Slicing and Dicing Objects
Share this video
Defining your fragment shapes using a Voronoi Graph, isn’t always straightforward. In some cases, a varied degree of experimentation is required. In this video, I will show you various ways you can achieve interesting fragment shapes, like straight Slices, radial slices and cubic fragments.
Transcript
Defining your fragment shapes using a Voronoi graph isn't always
straightforward. In some cases, a varied degree of experimentation is required.
Let's take a look at how we can experiment using the Voronoi Fracture object.
But remember, there are many ways to achieve the desired effect,
and I can't possibly show all of them. I can only give you a general direction.
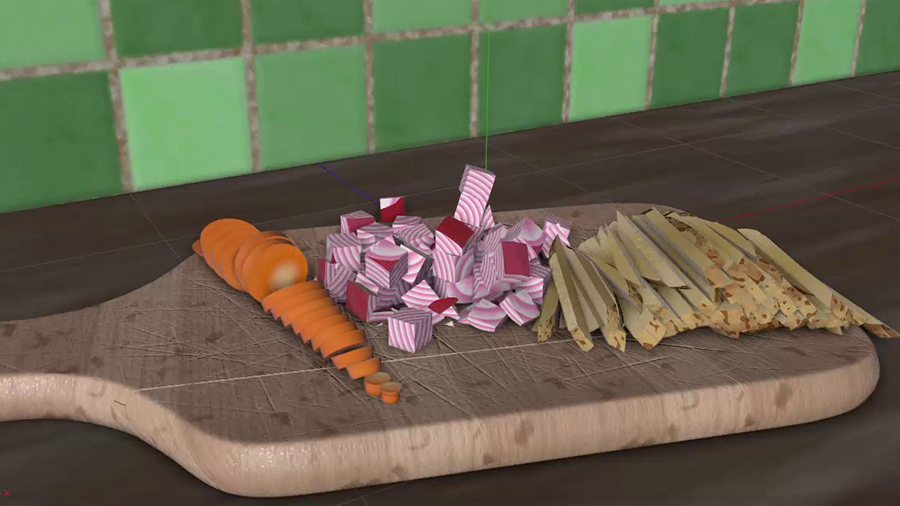
Let's begin with slicing. To slice an object, we need a straight line of points.
Let's go and create our Voronoi Fracture, drop our trusted Cube under it,
go to the Voronoi Fracture Sources and delete the Point Generator.
Now, my preferred way to create a straight point of lines is using the MoGraph Matrix
object, and you will see that it's my favorite object overall.
So, how do we do that? Well, first of all, let's make sure we have just one line,
not dots all over the place. And I'm going to do this by setting this to one and
setting that to one as well.
Excellent. So I'm going to add around five, and if I turn off the cube
for a second you will see that we have these five points. I'm going to use the
Matrix over here, and you can see that immediately we have a sliced cube.
Just to make it a bit more visible, I'm going to go here and add a bit of a gap.
There you go, so we have the slices. Now, there are many ways I can change this.
For example, I can rotate my matrix
and change the orientation of my slices. Fantastic. The same goes that way.
Or I can use it to dice. How do I do that? Well, let's go and add a few more points
in another axis. There we go, now we have these slabs. And then we can actually dice
it by adding points over there as well. Fantastic. So the Matrix object can slice
and dice any other object using the Voronoi Fracture,
providing we use it in the Sources.
Now, that's not the only thing it can do. If I select the Matrix object and change
the orientation from Grid Array to something like Radial, then we have radial
slices. Now that's fantastic. I'm going to make this bigger so we can see the points,
and now as we increase the points we can slice radially. By affecting the Matrix
with a Random Effector, you can create very interesting.fragment animations.
Something like this. Let me show you how this is done. To make it a bit more
interesting I've added a Sphere instead of a Cube, and you can thank me later.
Voronoi Fracture, drag the Sphere in here, let's create our Matrix,
let's go here and drag it in the Sources, and let's get rid of the Point Generator.
Okay, let's do something. I'm going to go to the Matrix object.
I'm going to set this to one and one.
Let's go and increase...actually I'm going to use five and five,
and I'm not going to use the Grid Array, I'm going to use the Honeycomb Array.
Okay, the Honeycomb Array is a bit big currently, so what I'm going to do is make
it smaller and smaller here as well. And let's zoom in and see what happens.
Now funny enough, these are six sided polygons
and you will see that they become hexagons providing a particular value.
But anyway, you can do quite interesting things with these little buggers,
something like this. Okay, so let's assume that this is what I want.
Maybe I can add a few more of these like that, and now I have my Sphere fragmented
nicely with these six sided shapes. Let me go and give them some spacing.
Great.
So let's create that effect. How do we go from this regular pattern to an irregular
pattern? Well, that's very simple. Select the Matrix, and go to MoGraph Effector,
and get a Random Effector. Fantastic. All I have to do now is animate this value and
it will go from zero Strength all the way to full Strength. Now you can see the
colors flashing. That is because the number of fragment changes because of the
orientation. So, what can we do about this? Well,
very simply, go here and get rid of the colorization. There you go.
So look at this, now I can animate this value, I can always hide the Matrix,
and go to frame 0, set the Strength to 0, go to frame 90,
set the strength to 100, and then rewind and press play and enjoy this
animation. Now we know how to slice and dice objects in a more predictable manner.
Let's continue and see what other tricks we have up our sleeve.
Définir les formes de vos fragments avec un graph Voronoi n'est pas
toujours linéaire.
Dans certains cas, un certain degré d'expérimentation est requis.
Voyons comment expérimenter avec le Voronoi Fracture Object.
Mais, souvenez-vous: il y a plusieurs façons d'atteindre l'effet désiré,
et je ne peux pas toutes vous les montrer.
Je peux vous donner une direction générale.
Commençons avec la Découpe.
Pour découper un objet, nous avons besoin d'une ligne de points toute droite.
Créons notre Fracture Voronoi, glissons y notre cube éprouvé,
dans Voronoi Fracture Sources, effaçons le Point Generator.
Ma méthode préférée pour créer une ligne droite de points est d'utiliser
le MoGraph Matrix Object.
C'est même, en général, mon objet favori.
Comment faisons-nous cela?
Avant tout, assurons-nous de n'avoir qu'une ligne, et pas de points partout.
Je vais faire ça en mettant ce paramètre à 1 et celui-ci aussi.
Excellent. J'ajoute environ 5, et, si je cache le cube un instant, vous voyez
que nous avons 5 points.
J'utilise la Matrice ici, et nous avons immédiatement un cube tranché.
Afin de rendre cela plus visible, je vais ici et ajoute un peu d'espace.
Nous avons nos tranches.
Il y a plusieurs façons de changer cela.
Par exemple, je peux tourner ma Matrice et changer l'orientation de mes tranches.
Fantastique. Ça marche aussi dans ce sens.
Je peux l'utiliser pour couper en dés. Comment faire?
Ajoutons quelques points sur un autre axe. Nous avons maintenant ces dalles.
Et nous pouvons les couper en dés en ajoutant des points ici.
Fantastique.
Le Matrix Object peut donc trancher et couper en dés quelque objet que vous
utilisiez avec le Voronoi Fracture.
à condition de l'utiliser dans les Sources.
Ce n'est pas la seule chose que cela peut faire.
Si je prend le Matrix Object et change l'orientation de Grid Array (réseau) vers
quelque chose comme Radial, nous aurons alors des tranches radiales.
C'est fantastique. Je vais grossir cela pour qu'on puisse
voir les points, et, en augmentant le nombre de points
nous tranchons de façon radiale.
En affectant la Matrice avec un Random Effector, vous pouvez
créer d'intéressantes animations de fragments.
Comme ceci.
Laissez-moi vous montrer comment c'est fait.
Pour rendre cela plus intéressant, j'ai ajouté une Sphère au lieu d'un Cube,
et vous pourrez me remercier plus tard.
Voronoi Fracture, je glisse la Sphère, crée la Matrice,
je glisse sous les Sources et efface le Point Generator.
Faisons quelque chose.
Je vais dans le Matrix Object. Je paramètre ceci à 1 et 1.
Augmentons... en fait, je vais mettre 5 et 5,
je vais utiliser le Grid Array, le Honeycomb (Nid d'abeille) Array
Ok, le Honeycomb est un peu gros, alors je vais le réduire comme ceci.
Zoomons et voyons ce qui se passe.
C'est amusant, ce sont des polygones à six faces et ils deviennent des hexagones
selon une certaine valeur.
Mais, quoi qu'il en soit, vous pouvez faire d'intéressantes choses
avec ces petites crapules, quelque chose comme ça.
Disons que c'est ce que je veux.
Je peux en ajouter un peu, comme ça, et ma Sphère est maintenant fragmentée
joliment avec des formes à 6 faces. Espaçons les un peu.
Génial.
Créons cet effet.
Comment passer de ce motif régulier à un motif irrégulier?
C'est très simple.
Je sélectionne la Matrice, vais dans le MoGraph Effector,
et prend un Random Effector. Fantastique.
Tout ce que j'ai à faire, c'est d'animer cette valeur
et elle ira de 0 à la Force maximale.
Vous voyez les couleurs clignoter.
C'est parce que le nombre de fragments
change à cause de l'orientation.
Que pouvons-nous faire?
Très simplement, débarrassons-nous, ici, de la colorisation. Voilà.
Regardez cela, je peux, maintenant, animer cette valeur,
je peux cacher la Matrice,
aller au frame 0, mettre la force à 0,
aller au frame 90, mettre la force à 100, revenir et presser Play,
et savourer cette animation.
Maintenant, nous savons comment trancher et couper en dés des objets
d'une façon plus prévisible.
Continuons pour voir les autres trucs que nous avons dans notre manche.
Definir as formas dos seus fragmentos usando um gráfico Voronoi não é sempre algo
fácil e simples. Em alguns casos, um certo nível de experimentação é necessário.
Vamos ver como podemos experimentar utilizando o objeto Voronoi Fracture.
Mas lembre-se, existem muitas maneiras de se conseguir o mesmo efeito e
eu não tenho como mostrar todas elas a vocês. Eu posso apenas dar uma ideia geral do processo.
Vamos começar fatiando. Para fatiar um objeto, nós precisamos de uma linha reta de pontos.
Vamos começar criando um Voronoi Fracture e arrastando nosso confiável cubo dentro dele,
clicar na aba Sources e então apagar o Point Generator.
Agora, meu método preferido de criar uma linha reta de pontos é utilizando um objeto MoGraph
Matrix e você logo vai entender porque este é o meu objeto favorito.
Então como fazemos isso? Bom, primeiramente, vamos nos certificar de que temos apenas uma linha
e não pontos por todos os lugares. Vamos fazer isso configurando aqui
e ali para 01.
Excelente. Agora vamos adicionar aqui o valor de 5 e se eu desligar momentâneamente o cubo,
podemos ver que temos cinco pontos. Vamos arrastar a Matrix
aqui e podemos ver que ela imediatamente fatia o cubo.
Apenas para tornar isso mais visível, vamos vir aqui e adicionar um espaçamento entre as fatias.
Pronto, agora temos fatias. Temos também muitas maneiras de alterar isso.
Por exemplo, eu posso rotacionar a Matrix
e alterar a orientação das minhas fatias. Fantástico! O mesmo funciona para o lado inverso.
Ou eu posso cortar em cubos. Como eu faço isso? Bom, vamos adicionar mais alguns pontos em um
outro eixo. Pronto, agora temos estas peças. E agora nós podemos cortar em cubo ao adicionar
mais pontos aqui. Fantástico. Então o objeto Matrix pode
fatiar e cortar em cubos qualquer objeto ao utilizar o Voronoi Fracture,
contanto que utilizemos o Matrix na lista Sources.
Agora, essa não é a única coisa que podemos fazer. Se eu selecionar o objeto Matrix e alterar a
orientação de Grid Array para algo como Radial, então teremos fatias radiais.
Isso sim é sensacional. Vamos alterar um pouco aqui para que possamos ver os pontos
e agora ao aumentarmos o número de pontos, podemos ver a fatia radial. Ao afetar o Matrix com
um Effector Random, você pode criar animação de fragmentos muito interessantes.
Algo como isso. Deixe-me mostrar como ele foi feito. Para tornar isso mais interessante,
eu adicionei uma esfera ao invés do cubo e você pode me agradecer disso depois.
Voronoi Fracture, arraste a esfera aqui, crie o Matrix,
vamos vir aqui e arrastá-lo para a lista Sources e então apagar o Point Generator.
Okay. Vamos fazer mais. Agora eu vou editar o objeto Matrix.
Vou configurar isso para 1 e isso para 1.
Vamos agora aumentar ... na realidade, vou usar 5 e 5 e não vou utilizar
o Grid Array. Vamos utilizar o Honeycomb Array.
Okay, o Honeycomb Array é um pouco grande, então vamos diminuí-lo
aqui e aqui e vamos nos aproximar para ver o que acontece.
Curiosamente, estes são polígonos de seis lados
e você pode notar que eles se tornam hexágonos quando você altera estes valores.
Mas em todo caso, você pode fazer coisas muito interessantes com esta organização de colméia,
como isso. Agora vamos partir do princípio que era isso que eu estava buscando.
Talvez eu possa adicionar mais alguns desses aqui e agora a minha esfera foi agradavelmente
fragmentada com estas formas de seis lados. Vamos dar um certo espaçamento entre eles.
Ótimo.
Agora vamos criar aquele efeito. Como podemos ir desse padrão regular para um padrão irregular?
Na verdade isso é muito simples. Selecione a Matrix, vá ao MoGraph Effector
e selecione o Random Effector. Fantástico. Tudo que eu tenho que fazer agora é animar este valor
e fazer ele ir de zero a cem no campo Strength. Agora, podemos ver as cores piscando.
Isso ocorre porque o número de fragmentos muda por causa da orientação.
Então o que podemos fazer quanto a isso? Bom,
simplesmente vamos vir aqui e desligar a opção Colorization. Pronto.
Vejamos isso aqui. Agora eu posso animar este valor, esconder a Matrix,
ir ao Frame 0, configurar a Strength também para 0, gravar um Keyframe, ir ao Frame 90,
configurar a Strength para 100, salvar um Keyframe, ir ao começo, apertar Play e curtir essa
animação. Agora sabemos como fatiar e cortar em cubos objetos de uma maneira previsível.
Vamos continuar e ver que outros truques temos em nossas mangas.