Voronoi Fracture Reference: Pre-Fracture Transformation - How to Create Interesting Fracture Shape
Share this video
Voronoi fragments have a very particular look. If you want to create objects that break slightly differently, this video is ideal. I will show a technique called “Pre Fracture Transformation”, to allow the fragmentation of “wood” and “granite”.
Transcript
It should be obvious by now that Voronoi Fractures have
a certain look. They look like well, Voronoi cells, and that's fine for a lot
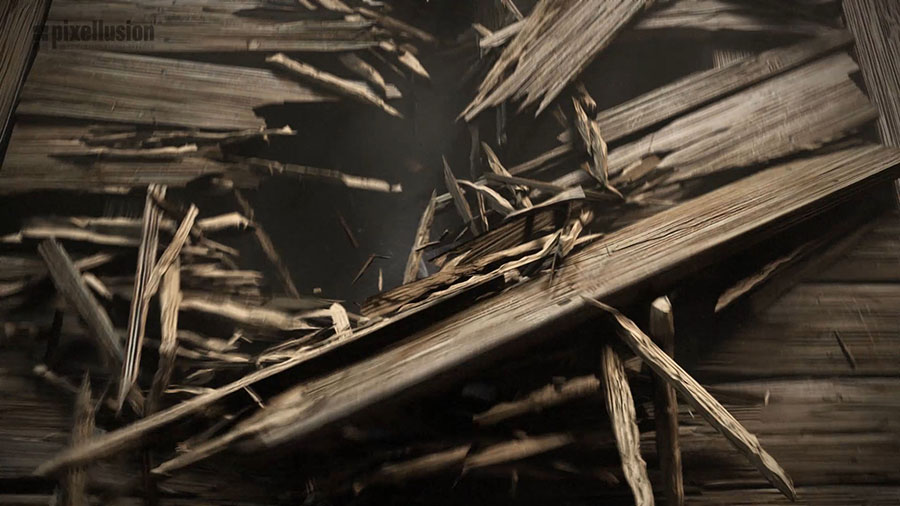
of applications, but some things just don't break like that. Wood,
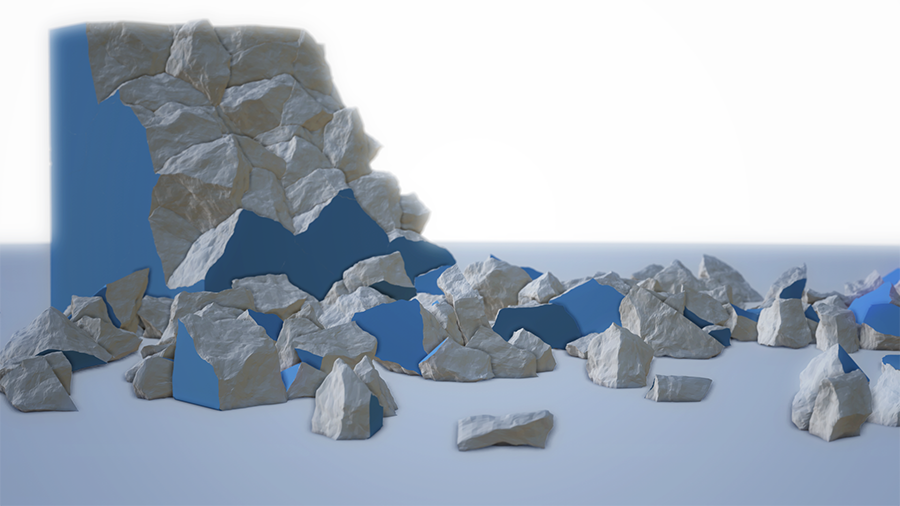
for example, has a more splintery look and granite breaks in slabs just to mention a
couple. In this video, I'll show you the method of pre-fracturing transformation
that allows you to create more interesting fragment shapes. Before offering you this
shiny bit of wisdom, let me take you down the wrong path.
If you do not know the pre-fracturing transformation method, you'll be tempted
to do the following. I'll make a fancy cube, no rounded edges this time.
I'm going to create a Voronoi Fracture object and drag it in there.
Now, one thing we can do is go to the Sources, select our Point Generator.
Bring this up a bit and untwirl the transformation tab. Now, what we can do is
choose to make the points closer to each other. Fantastic, so I'm going to add 200
points. What we see here is a sort of different type of fragmentation but the
downside to this is that all the main fractures are bunched up over here,
right in the middle. And if I go here make this as small as possible.
If I put zero it will become 0.01, which is the smallest possible
scaling in the X. And let me click outside, and you will see that the points
are created there. So we get this different type of look.
Now in order to continue, let me add some dynamics to this. I'm going to grab this
guy and put him 100 centimeters up. I'll create a floor which I'll make invisible.
And select these two right click and add a simulation tag. Now as I always tell you
make the bounce less and the friction more. And if I press play now,
you will see that they fall down like that. So this looks different than the
standard Voronoi, maybe it looks like wood, but there's an even better way.
For example, we can go here and start rotating these points as well,
and then again we're going to get all sorts of different types of shapes.
Regardless of how much you play around with these transformations,
you will always get something that looks like a, let's say elongated Voronoi.
So let's talk about the pre-fracturing transformation technique.
Let me go here and set these back to their default number. So,
what I'm going to do is the following, I'm going to get rid of all these because I'm
going to apply them later on. Maybe I'll leave that so, I just undid.
And I'm going to take this cube, go to the coordinates, and make it 10 times longer
in the X axis. And you can see that regardless of the scaling here,
the Voronois are applied uniformly. You can see all the points.
Excellent. What I'm going to do after this,
after the Voronoi Fracture, I'm going to add a Null object.
And I'll call this "Post Transform." I'm going to drag this in here and tell
this to be the opposite, so instead of 10, I'm going to make it 1 divided by 10.
So what we have here is something that doesn't look like a Voronoi these are
slabs. Now here's the problem if I go here and add a simulation Rigid Body Tag and
press play. You'll see that it doesn't take the pieces into account so l need to
go to the collision, make individual elements all, and I need to Apply Tag to
Children. If I rewind and press play, you see that this odd thing happens.
The reason this happens is that the fragments now contain this scaling.
So while they're rotating, you'll see that they try to scale to this odd shape which
is a tenth in the X axis and this thing will pose a problem because your
simulation doesn't look good. Okay, unless you want to do this.
How do we solve this? Well, it's not very difficult. I'm going to create a MoGraph
Fracture object. Our typical fracture object and make sure that the
post-transformation is a child of this. And I'm going to put the tag over here.
Now if I press play, you will see that originally nothing happens because we must
always tell the fracture that it needs to break the pieces apart.
Now we do lose the colors because each fragment now is a different object.
If I press play, you will see that everything retains its shape.
Now one of the downsides of this method is that you need to go here every time you
change this. And then you have to go here and change this in an equivalent manner,
in the opposite manner. And there's a setup I've come up with which helps solve
this using XPresso. Now if you don't want to see XPresso you can stop right here,
and you know how to do this method, but for the curious, here it is.
First of all, just to simplify things, I'm going to select my cube and press Alt+G
to create a Null as a parent. Now by default the transformation gets passed to
the parent object, that's how Cinema 4D works. I'm going to call this "Pretransf,"
good. And what I'm going to do is add an XPresso tag here. And what I will do is
create a mathematical formula. It's just a division where depending on what number I
have in here, this Null will receive one divided by that number.
So how do I do that? Well, drag this in here which is the driver object and let's
select it. And I'm going to drag this one here, then this one here.
That's an alternative way of adding inputs and outputs. I'm going to Cmd+double
click, or Ctrl+double click on PC, to expand this. And then I'm going to take
the post transf. Put it here and with the Null selected go here,
drag this one here, then this one and then this one. You can always go click here and
add them manually. Cmd+double click, excellent.
The next thing I'm going to do is right click and go XPresso, calculate and math.
And what I want to do is a division, one by the second input. So I want to one by
the second input here. I'm going to make a copy of this and another copy and dragging
and pressing Cmd. And I'm going to put this here, and I'll put this here.
So all these are one divided by the second input. I'm going to feed this in here,
in here and in here respectively. So the XYZ scale goes to the XYZ scale.
With this setup done what I can do is go here and actually make it as large or as
small as possible. And there you go, we have more slabs now. Look at that,
interesting? fantastic. You can even change and say I want 10 here and 10 here
and now we have more of a wooden shape. So this is what we call the pre-fracturing
transformation technique, and it allows you to create non-standard fragments that
don't look that much like Voronois. So I can't wait to see what you'll come up with
using this simple technique.
Il devrait être évident maintenant que les Voronoi Fractures ont
une certaine apparence.
Elles ressemblent à des cellules Voronoi,
et c'est correct pour bien des applications,
mais certaines choses ne se brisent pas comme cela.
Le bois, par exemple, se brise en éclats, quand le granit se brise en plaques,
pour ne mentionner que ceux-là.
Dans cette vidéo, je vais vous montrer
la méthode de transformation de Pré-fracturation
qui vous permet de créer des formes de fragments plus intéressants.
Avant de vous offrir cette brillante sagesse,
laissez moi vous entraîner du mauvais côté.
Si vous ne connaissez pas la méthode de transformation de Pré-fracturation,
vous serez tenté de faire ce qui suit.
Je fais un joli cube, sans arrondis cette fois.
Je crée un Voronoi Fracture Object et le glisse ici.
Dans Sources, je sélectionne le Point Generator.
Je remonte ça et déroule l'onglet Transformation.
Nous pouvons choisir de rapprocher les points les uns des autres.
Fantastique.
J'ajoute 200 points.
Ce que nous voyons ici est une sorte de fragmentation différente,
mais l'inconvénient est que toutes les fractures principales
sont regroupées ici, en plein milieu.
Si je veux tout réduire au maximum.
Si je mets 0, cela devient 0.01, qui est la plus petite échelle en X.
Je clique à l'extérieur, les points sont créés ici.
Ce qui donne une nouvelle apparence.
Pour continuer, j'ajoute des dynamics.
J'attrape le Cube et le monte à 100 centimètres.
Je crée un sol que je rend invisible.
Je sélectionne ces deux-ci, Clic-Droit, et ajoute un onglet de Simulation.
Comme je dis toujours: Moins de Bounce et Plus de Friction.
Je presse Play. Ils s'écroulent comme ça.
C'est différent du Voronoi standard,
ça ressemble peut-être à du bois, mais il y a une meilleure solution.
Par exemple, nous pouvons venir ici et tourner ces points ainsi,
puis, à nouveau, nous allons avoir différentes sortes de formes.
Indépendamment du temps que vous passerez à jouer avec ces transformations,
vous aurez toujours quelque chose qui ressemble à un Voronoi allongé.
Parlons de la technique de de transformation de Pré-fracturation.
Réglons tout aux paramètres par défaut.
Je me débarrasse de cela, car je vais les appliquer plus tard.
Je vais peut-être laisser cela. Je le désactive.
Je prends ce Cube, et dans ses coordonnées, je l'allonge de 10 en X.
Indépendamment de l'échelle, les Voronois sont appliqués uniformément.
Vous pouvez voir tous les points.
Excellent.
Après le Voronoi Fracture, j'ajoute un Null Object.
Et je nomme "Post Transform".
Je glisse cela ici et règle cela à l'opposé,
ainsi au lieu de 10, je vais mettre 1/10.
Ce que nous avons ici ne ressemble pas à un Voronoi, mais à des tranches.
Voilà le problème si je vais ici et ajoute un onglet de simulation de Rigid body,
et presse Play.
Ça ne prend pas les pièces en compte, aussi dois-je aller dans les Collisions,
choisir All dans les éléments individuels, et appliquer l'onglet aux Enfants.
Si je reviens en arrière et presse Play, cette chose étrange se produit.
La raison en est que ces fragments contiennent cette mise à l'échelle.
Ainsi, quand ils pivotent, ils essaient de se mettre à l'échelle
de cette étrange forme qui est 1/10ème dans l'axe des X,
ce qui va poser problème car la simulation n'est pas bonne.
Ok, sauf à ce que vous vouliez faire cela.
Comment pouvons-nous résoudre ça.
Ce n'est pas très compliqué.
Je crée un MoGraph Fracture Object. Classique et m'assure que le
Post-Transformation en est enfant.
Je place l'onglet ici.
Si je fais Play, rien ne se produit, car nous devons dire à la fracture
qu'elle doit briser les pièces.
Nous perdons les couleurs car chaque fragment est un objet différent.
Si je presse Play, tout conserve sa forme.
L'inconvénient de cette méthode c'est que vous devez aller ici à chaque fois
que vous changer ça. Et vous devez ensuite aller là pour
le changer de la même manière, à l'opposé.
Voici un paramétrage que j'ai fait et qui aide à résoudre ça avec XPresso.
Si vous ne voulez pas voir XPresso, vous pouvez arrêter maintenant,
et vous connaissez cette méthode. Mais, pour les curieux,voilà!
Premièrement, pour simplifier, je vais sélectionner mon Cube
puis presser Alt+G pour créer un Null comme parent.
Par défaut, la transformation est passée à l'objet parent.
C'est ainsi que Cinema 4D fonctionne. J'appelle ça "Pretransf".
Bien.
J'ajoute un onglet XPresso.
Puis, je crée une formule mathématique.
C'est juste une division, basée sur le nombre qui est ici,
le Null recevra 1 divisé par ce nombre.
Comment faire?
Glissons cela ici, dans le Driver Object et sélectionnons le.
Je glisse celui-là ici et celui-ci là.
C'est une façon alternative pour ajouter des entrées et des sorties.
Cmd+double clic, ou Ctrl+double clic, sur PC, pour étendre ça.
Je prends le "Postransf", le place ici, et, le Null sélectionné, vais ici,
glisse celui-là, puis celui-ci et celui là.
Vous pouvez toujours cliquer ici et les ajouter manuellement.
Cmd+double clic, excellent.
Puis je clique droit et vais dans XPresso, Calculate et Math.
Je veux diviser 1 par la seconde entrée.
Je fais une copie de ceci et une autre, puis je glisse et presse Cmd.
Je mets ça ici, et ça là.
Tout est divisé par la seconde entrée.
Je remplis ici, là et ici respectivement.
L'échelle XYZ dans l'échelle XYZ.
Avec ces réglages, je peux aller là et agrandir ou réduire autant que possible.
Nous avons plus de tranches maintenant.
Regardez-ça. Intéressant, non?
Fantastique.
Vous pouvez changer et mettre 10 ici et 10 là, et maintenant ça ressemble
plus à une forme de bois.
C'est ce qu'on appelle la technique de transformation de Pré-fracturation,
qui permet de créer des fragments non-standards qui ne ressemblent
pas à des Voronois.
J'ai hâte de voir ce que vous ferez en utilisant cette simple technique.
Neste momento, deve parecer óbvio que a Voronoi Fractures tem um certo
visual distinto. Eles parecem com, bom ... células Voronoi. E isso é okay para muitas de suas
aplicações, mas algumas coisas não quebram desse jeito. Madeira,
por exemplo, tem um visual mais estilhaçado e granito quebra em chapas, para mencionar apenas
dois casos. Neste vídeo, vou mostrar a vocês um método de transformação de pré-fratura,
que permite a você criar formas de fragmento mais interessantes. Mas antes de compartilhar este
pequeno e brilhante pedaço de conhecimento, deixa eu te levar pelo caminho errado.
Se você não conhece o método de transformação de pré-fratura, você ficaria tentado a
fazer o seguinte. Vamos pegar esse cubo chique, desta vez sem bordas arredondadas.
Vamos criar um objeto Voronoi Fracture e arrastar o cubo aqui.
Agora, algo que podemos fazer é ir a aba Sources e selecionar o nosso Point Generator.
Vamos aumentar o tamanho do menu e expandir a aba Transformation. Agora o que podemos fazer
é alterar o escalonamento, fazendo com que os pontos fiquem mais próximos um dos outros. Fantástico.
Vamos adicionar 200 pontos. O que vemos aqui é um tipo diferente de fragmentação, mas o ponto
negativo deste método é que todas as fraturas principais estão amontoadas aqui,
bem no meio. E se eu tentar fazer isso o menor possível?
Se eu colocar o número 0, ele se torna 0.01, que é o menor valor possível
na Scale em X. Deixe-me clicar fora e você pode ver que os pontos
são criados ali. Então nós conseguimos este tipo diferente de visual.
Para continuarmos, vamos adicionar dinâmicas. Eu vou pegar esse cara aqui
e colocar ele 100 centímetros pra cima em Y. Agora vamos criar um Floor e deixar ele invisível.
Selecione os dois e com o botão direito, adicione uma tag Simulation > Rigid Body. E como eu
sempre te digo, faça ele quicar menos e aumente a fricção. Agora se eu apertar Play,
você pode ver que eles caem assim. A aparência já é diferente
do Voronoi padrão, talvez seja parecido com madeira, mas existe um método melhor.
Por exemplo, nós podemos vir aqui e começar a rotacionar estes pontos
e então vamos ter todos estes diferentes tipos de formas.
Independentemente do quanto você brincar com estas transformações,
você vai sempre ter algo que parece com, vamos ver, um Voronoi alongado.
Vamos então abordar a técnica de transformação de pré-fratura.
Vamos retornar estes valores a configuração padrão. Agora
o que eu vou fazer é o seguinte ... eu vou me livrar de todos esses porque
eu vou aplicar eles depois. Talvez eu matenha apenas esse, então eu utilizei o Undo.
Vamos pegar este cubo, ir as coordenadas e fazer ele ficar 10 vezes mais longo
no eixo X. E você pode perceber que, não importando o escalonamento,
os Voronois são aplicados uniformemente. Você pode ver todos os pontos.
Excelente. O que vou fazer agora,
depois do Voronoi Fracture, é adicionar um objeto Null.
Vamos chamar ele de Post Transf. E eu vou arrastar e configurar ele pra
ser o oposto, então ao invés de 10, eu vou colocar 1/10 (dividido).
O resultado que temos é algo que não se parece em nada com um Voronoi e sim com chapas.
Agora o problema que temos é que se eu for aqui e adicionar uma tag Simulation > Rigid Body
e apertar o Play, bom ... você pode ver que a simulação não levou em consideração as peças.
Então eu preciso ir a aba Collision e selecionar Individual Elements > All e preciso também
configurar o Inherit Tag para Apply Tag to Children. Rebobinando e apertando Play de novo, algo estranho acontece.
O motivo disso acontecer é que os fragmentos contém este escalonamento,
então, conforme eles estão rotacionando, você pode ver que eles tentam se dimensionar a esta
estranha forma que é um décimo no eixo X e isso ocasiona um problema porque a simulação
não fica boa. Agora, a não ser que esse seja o resultado que você procura ...
Como podemos resolver? Bom, isso não é muito difícil. Eu vou criar um objeto MoGraph
Fracture. O nosso típico objeto de fratura e vou me certificar que o
Null Post Transf seja um filho dele. Agora vamos realocar a Tag para cá.
Ao apertar Play, podemos ver que nada acontece porque nós
sempre precisamos informar a fratura que ela precisa quebrar os pedaços.
Infelizmente nós vamos perder as cores, porque agora cada fragmento é um objeto diferente.
Ao apertar Play, podemos ver que todos mantém a sua forma.
Um dos problemas com este método é que você precisa vir aqui toda vez
para alterar isso. E então você tem que vir aqui e alterar isto,
mas de maneira oposta. Mas tem uma configuração que eu desenvolvi que ajuda
a resolver isso, usando Xpresso. Agora se você não quer ver Xpresso, melhor parar por aqui,
já que você já sabe fazer este método. Mas para os curiosos, aqui está.
Primeiro, para simplificar as coisas, eu vou selecionar o meu cubo e apertar no teclado Alt+G
para criar um Null como pai da hierarquia. Por padrão, a transformação é passada para o pai
da hierarquia, pois é assim que o Cinema 4D trabalha. Vamos chamá-lo de Pre Transf. Bom.
O que vou fazer agora é adicionar uma Tag Xpresso aqui. Depois vamos criar uma
fórmula matemática, basicamente uma divisão, que dependendo do número que eu
tiver aqui, este Null vai receber 1 dividido por aquele número.
Mas como eu faço isso? Bom, arraste isso aqui, já que ele é o objeto que comanda e vamos
selecioná-lo. Agora vamos arrastar esse aqui e então este outro aqui.
Existe uma maneira alternativa de adicionar entradas e saídas. Vou apertar Cmd+Clique duplo
ou Ctrl+Clique duplo no PC, para expandir aqui. E então eu vou pegar
o Post Transf e colocá-lo aqui. Com o Null selecionado, venha aqui
e arraste esse para cá e então este outro e este aqui. Você pode sempre clicar aqui
e adicionar eles manualmente. Cmd+Clique duplo, excelente.
A próxima coisa que eu vou fazer é clicar com o botão direito e ir em Xpresso > Calculate > Math.
E o que eu quero é uma divisão, a primeira entrada pela segunda. Então eu quero a primeira
pela segunda entrada aqui. Vou agora fazer uma cópia dele aqui e então outra cópia ao arrastar
segurando a tecla Cmd ou Ctrl. E eu vou conectar esse aqui e o outro aqui.
Então todos estes serão divididos pela segunda entrada. Vamos conectar este aqui,
aqui e aqui respectivamente. Então o escalonamento XYZ vai para o XYZ.
Com esta configuração feita, o que eu posso fazer é vir aqui e fazer isso o quanto maior
ou o quanto menor possível. E aí teremos mais chapas. Interessante não?
Fantástico. Você pode até alterar aqui e colocar 10 aqui, 10 ali e agora
nós temos uma forma mais parecida com madeira. Então isso é o que eu chamo de técnica de
transformação de pré-fratura e ela permite que você crie fragmentos não padrões que não
se parecem em nada com Voronois. Não posso esperar para ver o que você vai conseguir
criar usando esta técnica.
Related

R19 Voronoi Fracture Reference: Fracturing Enhancements - Scale Cells
Voronoi Fracture Reference
New in Cinema 4D R19: Join Fragments, Roughen Edges, Splinter Wood, and more with Voronoi Fracture
What's New in R18: Slice, Dice, & Julienne Objects with Voronoi Fracture Sources