Getting Started with CINEMA 4D R15, Part 21: Introduction to Rendering
Share this video
In this video you will be introduced to what you need to know to get your images out of CINEMA 4D. This includes setting up the final output paths and adjusting the quality of the render using Anti-Aliasing. You’ll also learn how bit depth can affect flexibility in post-production.
Transcript
In this video you'll prepare your project for rendering out an image sequence
that you can then finish in the post processing application of your choice.
To do this you're going to start by clicking on the render settings icon.
Then, click on the output tab,
and make sure that the settings match the final output size that you want to use.
In this case, 1280 by 720.
Since you're going to do a couple test renders to make sure that all of the settings are correct
you want to leave the frame range set to current frame for now.
Once you set the frame range you're ready to deal with the quality of the render
as there are issues with some of the edges esspecially around the logo on the rocket ship,
and the hard shadows on the planet's surface.
Whenever you see these jagged lines in the render,
or something that looks like a boiling texture then you're seeing the effects of aliasing.
Aliasing is caused by the renderer not having enough information available to generate the correct color for pixel.
So to help reduce the effects caused by aliasing
the renderer can subdivide a single pixel into sub pixels,
and then blend though sub pixels together to provide a more accurate pixel color
all of which happens behind the scenes this is known as Anti-Aliasing.
If you click on the Anti-Aliasing tab in the render settings
you'll be presented with attributes related to Anti-Aliasing.
The first option is a drop down set to Geometry.
This drop down allows you to set how Anti-Aliasing is applied to the render.
Start by setting this drop down to "None", and then render to the picture viewer.
Now, if you zoom in to examine the results
you can clearly see many areas where there are visible artifacts caused by Aliasing.
If you switch the mode back to geometry and render again.
You'll see that the edges of the object are smooth,
and things like the textures, reflections, and shadows are still jagged.
That is because geometry mode means the edges of objects,
or the geometry in the scene are subject to Anti-Aliasing.
That means anything across the surface of an object may still end up with artifacts.
Now, in cases where you need the best possible quality
you want to set the Anti-Aliasing mode to "Best".
This makes sure that every pixel in your image
will get at least some amount of Anti-Aliasing applied.
Generally, this mode will be needed any time you're working with
textures, hard shadows, transparency, or pretty much anything
where you're seeing some sort of detail across the surface of or through an object.
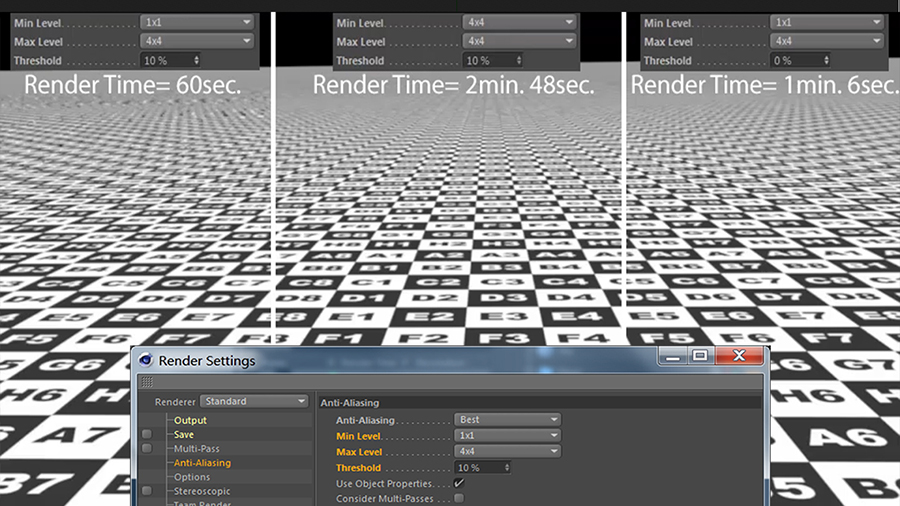
The specific amount of Anti-Aliasing applied will be determined by the
Min & Max levels,The Threshold, and the Filter.
In this case, you should be able to get away with using the defaults,
but if you still notice issues you may want to start increasing the Min & Max settings.
These values control how many times a pixel is subdivided internally,
and the Threshold is used to decide when the Min value is used & when the Max value is used
It should be noted that increasing the Min & Max level and lowering the Threshold
means that you'll get more subdivisions across more of the image.
Meaning a better looking result, but longer render times.
So, after looking at the different Anti-Aliasing modes
it's fairly clear that you rarely use None for a final render.
So you may wonder why would you ever use "None"?
Well, this is because Anti-Aliasing can increase render times, sometimes significantly.
So generally, this setting will be used for preview renders.
As you'll still get a good idea about what is seen or animation looks like
while bypassing the long render times associated with Anti-Aliasing.
Once you have the Anti-Aliasing setup to provide the best results you want to set the save path.
So, click on the save tab in the render settings.
The top section contains attributes for saving a regular image.
This refers to an image that combines all passes together which is the default,
and it will always match what you see in the picture viewer.
Now, the first step is to decide where you would like to save the resulting images,
and what they should be named.
Click on the path button to the far right of the file attribute
this will open up the system save file dialog.
Navigate to the location where you want to save and set the file name to "CV_rocket".
Finally, click "Save".
Next, you need to decide which file format you'll use for output.
While doing animation tests
saving directly to MOV or AVI from the picture of your history
produced single files that were easy to deal with,
and generally worked pretty well in that situation.
But when you want to start working with footage in post
doing color correction or more advanced compositing
these formats are not the best choice.
Now, one of the reasons for this is that if a render fails you can lose data
and repairing the files is more hassle than it needs to be,
but perhaps more importantly is the fidelity of the image data.
Each pixel in an image has a bit depth per channel.
This can be generalized
as the amount of color information that gets stored in each pixel per channel
with most video formats you're limited to how much data can be stored in each pixel.
Which in turn limits how far you can push the footage in post.
To see the results of this
you can take an 8 Bit, 16 Bit, and 32 Bit image and apply a filter to them in the picture viewer.
By raising the gamma value
you'll notice artifacts or banding appear where smooth shading would be expected.
When looking at the 8 Bit image some of these artifacts looks very regular,
and are actually the dithering pattern used to try and fake a smooth transition between values.
When you look at the 16 Bit image
you can see that the dithering pattern is removed,
but there's still heavy banding in the shading itself.
When you switch to a 32 bit image
you can see that the dithering pattern is gone,
and the strong banding in subtle shading is also gone.
While most of these artifacts are not always apparent when you're viewing images directly in the picture viewer
as soon as you start trying to push the value of the image
the lower bit depth images start to exhibit these issues sooner.
So, if you shouldn't render movies directly out of Cinema 4D
What should you do?
The best practice here is to render to an image sequence.
Then use a compositing application of your choice,
such as After Effects or Final Cut, to export the final movie.
Remember, it's a good idea to verify what formats these applications support.
As generally they do support image sequences
as well as layer blending necessary for multipass work,
and will generally support all the various file formats and their associated bit depths.
But there may be the odd format or effect that is not supported so double check.
All that said, the actual format that you choose
really depends on the workflow that you decide to use.
For example, if you wanted to explore a 32 bit workflow
this limits the image formats that you can use to only those that support 32 bits per channel,
or if you wanted to render multi pass to a single file
then you would need to make sure that the format you select supports a layers.
In terms of bit depth there's nothing technically wrong with rendering steals as an 8 bit image,
but given the relatively small file size and the extra color range in a 16 bit image
it's good to work in 16 bit at the least.
As you can push them a little further in post,
and they require little adjustment in workflow when coming from working with 8 bit images.
This still leaves you with a few options...
Such as PSD, TIFF, EXR even PNG.
In this case, since the final output will be brought into After Effects
you can work with the PSD to keep everything in the Adobe family.
Since the PSD format supports multiple bit depths
you need to make sure that you select the debts you want from the depth drop down.
In this case, 16 bits per channel.
Next, the name drop down allows you to choose from several different naming conventions
that can be used when rendering sequential images.
By default, it will simply append the frame number directly to your file name you set,
but you can also choose how many numbers, as well as if a separators used or not.
Again, this choice is up to you and how you like to work.
Since it's nice to have some indication of where the frame number starts
you can select the option for the name, then a period, followed by the frame number, and finally the file extension.
Once all of the attributes for rendering have been set you'll want to go back to the output tab,
and set the frame range to All Frames.
With that done you'll want to save incremental, and then click render to picture viewer.
When you do this you can preview the frames as they finish rendering in the picture viewer,
but they will also be written to the destination you set in the output tab.
Once the render has finished you can load your footage into your Post Processing application,
and create the final video.
Now, if you're interested in finding out more about multi-pass rendering
head onto the next video in the series.
このビデオでは、プロジェクトを連番画像にレンダリングする準備します。
それを好みのポストエフェクトアプリケーションで 仕上げることができます。
これを行うには、まずレンダリング設定を編集アイコンをクリックします。
次に、出力タブをクリックし、
設定が使用したい最終出力サイズと一致しているか確認してください。
今回の場合は、1280 x 720にします。
すべての設定が正しいか確認するため、 いくつかのテストレンダリングを行いましょう。
フレームレンジを現在のフレームに設定したままにします。
フレームレンジを設定したら、 レンダリングの品質を設定する準備をします。
ロケットのロゴの周りや地球の表面のハードな影の輪郭に
ジャギーの問題があります。
レンダリングでこうしたギザギザの線が見えるときは
テクスチャが荒いように見えますが、 エイリアシングの影響によるものです。
エイリアシングは、レンダリング時にピクセルの正しい色を生成するのに 十分な情報がないために発生します。
エイリアシングによって引き起こされるこうした影響を減らすために
レンダラーは、1つのピクセルをサブピクセルに細分化することで
そしてサブピクセルを統合して、 より正確なピクセルカラーを提供します。
これらはすべてバックグランドで行われ、 これはアンチエイリアスとして知られています。
レンダリング設定で[アンチエイリアシング]タブをクリックすると
アンチエイリアスに関連する属性が表示されます。
最初のパラメータのドロップダウンが、[ジオメトリ]に設定されています。
このドロップダウンは、レンダリングにアンチエイリアスを 適用する方法を設定できます。
このドロップダウンを「なし」に設定してから、 画像表示にレンダリングを実行してみましょう。
拡大して結果を見ると
エイリアシングによって引き起こされたはっきりとした アーティファクトが多くのところで見ることができます。
モードをジオメトリに戻して再度レンダリングすると、
オブジェクトの端が滑らかであることがわかりますが、
テクスチャ、反射、影のところはまだギザギザです。
つまりジオメトリモードとは、オブジェクトのエッジを意味し、
シーン内のジオメトリはアンチエイリアシングの影響を受けます。
しかし、オブジェクトの表面全体には 何かしらのアーティファクトで残っている可能性があります。
今、可能な限り最高の品質が必要な場合は、
アンチエイリアスモードを「ベスト」に設定してください。
これにより、画像内のすべてのピクセルに
いくらかのアンチエイリアスを適用されます。
一般的に、テクスチャ、ハードシャドウ、透明度に対して
適用したいときは、このモードを使います。
オブジェクト全体やサーフェイスを通して オブジェクトを見た場合も対象です。
アンチエイリアシングの適用度合いは
最小/最大レベル、しきい値、フィルタで制御します。
この場合、デフォルトの設定を使用していただいて問題ありません。
それでも問題が発生した場合は、最小/最大の設定を増やします。
これらの値は、ピクセルが内部で細分化された回数を制御し、
しきい値は、最小値が使用するか、最大値が使用するが決まります。
最小/最大レベルを上げてしきい値を下げると
画像の多くの部分がさらに細分化されることを意味します。
より良い結果が得られますが、その分レンダリング時間は長くなります。
アンチエイリアシングモードの違いを見てみましょう。
最終的なレンダリングに[なし]を使用することはめったにありません。
では、なぜ「なし」を使うでしょう?
これは、アンチエイリアシングによって レンダリング時間が大幅に短縮されることがあるためです。
一般的に、この設定はプレビュレンダリングに使用されます。
見え方やアニメーションからアイデアが得られます
アンチエイリアシングが原因の長いレンダリング時間を無くせます。
最適な結果を得るためのアンチエイリアス設定が完了したら、 保存先のパスを設定します。
そのため、レンダリング設定の[保存]タブをクリックします。
上部のセクションには、通常の画像を保存するための パラメータが含まれています。
デフォルトではすべてのパスを組み合わせた画像を指しています。
画像表示に表示されているものと常に同じです。
今、最初のステップは、結果の画像をどこに保存するかを決めます。
それと保存名を決めます。
ファイル属性の右端にあるパスボタンをクリックします。
システムのファイル保存ダイアログが開きます。
保存する場所に移動し、ファイル名を「CV_rocket」に設定します。
最後に、[保存]をクリックします。
次に、出力に使用するファイル形式を決定する必要があります。
アニメーションテストを行うなら、
履歴の画像から直接MOVまたはAVIに保存します。
というのも、単一のファイルの方が扱いやすいからです。
一般的な状況ではそれで問題ありません。
しかし、映像にポストエフェクトとして、
色補正やより高度な合成を行いたい場合は、
これらのフォーマットは最良の選択ではありません。
理由の1つは、レンダリングが失敗した場合、 データを失う可能性がある点です。
ファイルを修復することは、必要以上に面倒です。
さらに重要なのは画像データの情報量が多くできるからです。
画像内の各ピクセルはチャネルごとに色深度を持ちます。
これは一般化するために、
ビデオフォーマットにおけるチャネルごとに 各ピクセルに格納される色情報の量は
各ピクセルに保存できるデータの量に制限があります。
そのため映像を後からの補正に制限が出てきます。
この結果を見るには
8-bit、16-bit、32-bitの画像を用意し、 画像表示でそれらにフィルタを適用するとわかります。
ガンマ値を上げると
スムーズな陰影に対して、 アーティファクトやバンディングが発生することがあります。
8-bit画像を見ると、こうしたアーティファクトが 非常に頻繁に発生します。
実際にはディザリングパターンを適用することで、 擬似的にスムーズな適用を実現します。
16-bitの画像の場合、
ディザリングパターンが削除されていることがわかります。
しかし、まだシェーディングに強いバンディングがあります。
32ビットイメージに切り替えると
ディザリングパターンがなくなったことがわかります
微妙な濃淡でも、強いバンディングもありません。
これらのアーティファクトのほとんどは、 画像表示で直接画像を表示しているときに必ずしも明瞭ではありませんが
色深度のビット数が少ない画像にすると
こうした問題が発生してきます。
これがCinema 4Dから直接ムービーファイルで レンダリングしてはならない理由です。
ではどうするべきでしょうか?
ここでの最適な方法は、連番画像でレンダリングすることです。
それから、After EffectsやFinal Cutなど好みの コンポジットアプリケーションを使用して、
最終のムービーを書き出すことができます。
事前に、これらのアプリケーションが サポートする形式を確認してください。
一般的にそれらのソフトは、連番画像をサポートしています
必要に応じて、マルチパスを使ってレイヤ合成も行えます。
一般的に、様々なファイル形式と それに関連する色深度のすべてをサポートします。
しかし、サポートされていないフォーマットや効果が あるかもしれませんので、ダブルチェックしてください。
実際に選ぶべきフォーマットは、
実際に使用するワークフローによって変わります。
たとえば、32-bitのワークフローを行いたい場合
使用できるイメージ形式がチャネルごとに 32-bitをサポートするものだけに制限され、
または複数のパスを1つのファイルにレンダリングする場合は
選択した形式がレイヤーをサポートしていることを 確認する必要があります。
色深度に関して、レンダリングを8-bit画像で行っても 技術的に間違ったものはありませんが、
しかし、16-bit画像は比較的小さいファイルサイズでありながら 幅広い色深度を持っているので、
16-bitで作業をするとよいでしょう。
コンポジット作業においても
8ビット画像で作業しているときとワークフローの違いは ほとんどありません。
その上で、選択肢も広く
PSD、TIFF、EXR、PNGなどが使えます。
今回の場合、最終的な出力はAfter Effectsに持っていきますので、
PSDを使えば、Adobeファミリーなので全て保つことができます。
PSDフォーマットは複数の色深度をサポートしているので
色深度のドロップダウンから 必要な色深度を選択します。
この場合、16 bit/chです。
次に、名前のドロップダウンから、 いくつかの異なる命名規則から選択することができます
連番画像をレンダリングするときに使います。
デフォルトでは、設定したファイル名に フレーム番号を直接追加するだけです。
セパレーターだけでなく 桁数も選択することもできます。
繰り返しますが、この選択はあなた次第であり、 作業によって選びます。
フレーム番号ならどこから始まるのかわかりやすいので
名前、ピリオド、フレーム番号、最後にファイル拡張子の (名前.0000.TIF)オプションを選択します。
レンダリングのすべての属性が設定されたら、出力タブに戻って、
フレームレンジを全てのフレームに設定します。
履歴保存してから、画像表示にレンダリングをクリックします。
これを行うと、画像表示でレンダリングが 終了したフレームがプレビュされ、
出力タブで設定した保存先にも書き込まれます。
レンダリングが完了したら、 映像をコンポジットアプリケーションに読み込んで
最終ビデオを作成します。
マルチパスレンダリングの詳細については、
シリーズの次のビデオで紹介します。
Neste vídeo você irá preparar o seu projeto para renderizar uma sequência de imagens
que você então poderá finalizar em um programa de pós-produção de sua escolha.
Para fazer isso, vamos começar clicando no ícone Render Settings.
Depois, clique na aba Output
e verifique se as configurações se igualam ao tamanho final que você quer usar.
Neste caso, 1280 x 720.
Já que você vai fazer alguns testes de renderização para verificar se as configurações estão corretas,
você deve deixar o Frame Range (extensão dos quadros) selecionado em Current Frame (frame atual).
Assim que você configurar o Frame Range, você está pronto para começar a lidar com a qualidade da renderização,
já que temos alguns problemas nas bordas, especialmente em torno do logo e do corpo do foguete,
como também nas sombras duras na superfície do planeta.
Aonde você ver estas linhas chanfradas na imagem renderizada
ou algo que lembra uma textura em ebulição, você está vendo os efeitos do Aliasing.
O Aliasing ocorre quando o motor de renderização não tem informação suficiente para gerar a cor correta para cada pixel.
Então, para ajudar a reduzir os efeitos causados pelo Aliasing,
o motor de renderização pode subdividir um único pixel em sub-pixels
e então combiná-los para proporcionar uma cor de pixel mais precisa.
Tudo isso acontece internamente no Cinema 4D e isso é conhecido por Anti-Aliasing.
Se você clicar na aba Anti-Aliasing, nas configurações de renderização,
você tem acesso aos atributos relacionados ao Anti-Aliasing.
A primeira opção é um menu suspenso Anti-Aliasing configurado para Geometry (geometria).
Este menu permite que você configure como o Anti-Aliasing é aplicado na renderização.
Vamos configurar o menu para None (nada) e então clicar no Render to the Picture Viewer.
Se você aplicar um Zoom para examinar os resultados,
você pode ver claramente que em muitas áreas existem artefatos visíveis causados pelo Aliasing.
Se você alterar o menu de volta a Geometry e renderizar novamente,
você pode ver que as bordas do objeto estão suaves,
mas coisas como texturas, reflexões e sombras ainda estão chanfradas.
Isso ocorre porque o modo Geometry permite que as bordas dos objetos
ou a geometria da cena fiquem sujeitas ao Anti-Aliasing.
O que significa que qualquer outra coisa sobre a superfície de um objeto pode acabar tendo artefatos.
Quando ocorrer casos em que você precisa da melhor qualidade possível,
você deve configurar o modo Anti-Aliasing para Best.
Este modo certifica que todo pixel em sua imagem
vai ter no mínimo alguma quantidade de Anti-Aliasing aplicada.
Geralmente este modo é necessário quando você trabalha
com texturas, sombras duras, transparência e basicamente qualquer coisa
aonde você vê um tipo de detalhe sobre ou através da superfície de um objeto.
A quantidade específica de Anti-Aliasing aplicada vai ser determinada pelos atributos
Min Level e Max Level, o Threshold e o Filter.
Normalmente você consegue bons resultados utilizando a configuração padrão,
mas caso você continue notando problemas, você pode começar aumentando os atributos Min Level e Max Level.
Estes valores controlam quantas vezes um pixel vai ser subdividido internamente
e o Threshold é usado para decidir quando o Min Level e o Max Level são utilizados.
Caso você aumente o Min e o Max Level e diminua o Threshold,
isso significa que você vai ter mais subdivisões por toda a imagem.
E isso gera um melhor resultado, mas com tempos de renderização maiores.
Então, após olhar os diferentes modos de Anti-Aliasing,
está claro que você raramente irá utilizar o modo None em sua renderização final.
Você então pode se perguntar porquê usar o modo None ...
Como o Anti-Aliasing pode aumentar o tempo de renderização, às vezes significamente,
o modo None deve ser utilizado para renderizações testes.
Estas renderizações permitem que você tenha uma boa ideia final de como a imagem ou a animação vai ficar,
ao mesmo tempo que você evita ter os longos tempos de renderização associados ao Anti-Aliasing.
Assim que você tiver configurado o Anti-Aliasing para proporcionar os melhores resultados, você deve configurar a localização da renderização.
Clique na aba Save (salvar) no Render Settings.
A seção superior contém atributos para salvar uma Regular Image (imagem normal).
Isso se refere a uma imagem que combina todos os canais de renderização juntos, que é o modo padrão
e que vai sempre ser igual ao que você vê no Picture Viewer.
O primeiro passo é decidir aonde você quer salvar as imagens renderizadas
e como elas devem ser chamadas.
Clique no botão "..." a direita do atributo File
para abrir uma janela do sistema com o diálogo para salvar o arquivo.
Navegue até a localização aonde você quer salvar o arquivo e configure o nome para "cv_rocket".
Por último, clique em Save.
Agora você precisa decidir qual será o formato de arquivo de saída.
Enquanto estiver fazendo testes na animação,
salvar diretamente como .MOV ou .AVI pelo histórico do Picture Viewer
produz arquivos únicos que são fáceis de lidar
e geralmente funcionam muito bem para estas situações.
Mas quando você quer trabalhar com a imagem na pós-produção,
fazer correção de cor ou alguma composição mais complexa,
estes formatos não são a melhor escolha.
Uma das razões é que, caso a renderização falhe, você provavelmente irá perder dados
e consertar estes arquivos é muito mais trabalhoso do que precisa ser.
Mas talvez o problema mais importante é a fidelidade dos dados de imagem.
Cada pixel em uma imagem tem um Bit Depth per Channel (profundidade de bits por canal).
Podemos generalizar isto
como a quantidade de informação de cor que é salva em cada pixel por canal.
Na maioria dos formatos de vídeo, você está limitado na quantidade de dados que pode ser salvo em cada pixel.
Isso em troca afeta o quanto você pode trabalhar com essa imagem na pós-produção.
Para vermos os resultados disso,
vamos pegar imagens 8 Bit, 16 Bit e 32 Bit e aplicar um filtro diretamente no Picture Viewer.
Ao aumentarmos o valor da Gamma,
você pode notar que artefatos ou falhas aparecem aonde um sombreamento suave seria esperado.
Quando avaliamos a imagem 8 Bit, alguns destes artefatos parecem bem normais
e são na verdade um Dithering Pattern (padrão pontilhado) usado para tentar falsificar uma transição suave entre os valores.
Quando você olha a imagem 16 Bit,
você pode ver que o Dithering Pattern foi removido,
mas ainda temos grandes falhas no próprio sombreamento.
Quando você olha a imagem 32 Bit,
você percebe que o Dithering Pattern foi removido
e que as falhas no sombreamento também foram removidas.
A maioria destes artefatos não são sempre aparentes quando você está vendo imagens diretamente no Picture Viewer,
mas no momento em que você tenta trazer alguma característica da imagem,
as imagens com menos Bit começam a exibir antes estes problemas.
Então se você não deve renderizar filmes diretamente do Cinema 4D,
o que devemos fazer?
A melhor maneira seria renderizar uma sequência de imagens
e então usar um programa de composição que você deseje,
como After Effects ou Final Cut, para exportar o vídeo final.
Lembre-se de sempre verificar quais formatos esses programas suportam.
Geralmente eles suportam sequências de imagens,
como também a combinação de camadas necessárias para o trabalho em múltiplos passes/canais,
além de suportarem os mais variados tipos de formatos e as profundidades de bits associadas.
Mas pode acontecer de existir algum formato ou efeito singular que não é suportado. Portanto, sempre verifique antes de renderizar.
Passada todas estas informações, o formato que você vai escolher
depende apenas do fluxo de trabalho que você decidir seguir.
Se por exemplo, você quiser explorar o fluxo de trabalho em 32 Bit,
a quantidade de formatos vai ser limitada já que apenas alguns formatos suportam 32 Bits por canal.
Ou caso você queira renderizar múltiplos passes/camadas em um único arquivo,
você vai precisar se certificar que o formato escolhido suporta layers/camadas.
Em termos de profundidade de bits, não existe nada tecnicamente errado com a renderização de imagens 8 Bit,
mas já que elas são só um pouco menores em tamanho que as imagens 16 Bit, que possuem maior extensão de cor,
é interessante sempre se trabalhar com no mínimo imagens 16 Bit,
já que elas permitem que você tenha mais escopo no trabalho de pós-produção,
além de exigirem poucos ajustes no fluxo de trabalho quando comparado a imagens 8 Bit.
Então temos apenas algumas opções ...
.PSD, .TIFF, .EXR e até .PNG.
No nosso caso, como o material final será importado no After Effects,
podemos trabalhar com o formato .PSD e manter tudo na família Adobe.
E como o formato .PSD tem suporte a várias profundidades de bits,
você precisa certificar que escolheu os bits corretos do menu suspenso Depth.
No nosso caso, 16 Bits per Channel.
Já o menu suspenso Name permite a escolha de diferentes convenções de nomenclatura
que podem ser usadas quando renderizamos sequências de imagens.
Por padrão, será acrescentado o número dos quadros diretamente ao nome do arquivo que você configurou,
mas você pode alterar a quantidade de números como também o uso ou não de separadores.
Novamente essa escolha é pessoal e baseada na maneira como você trabalha.
Como é útil ter uma indicação de onde começa a numeração dos quadros,
você pode selecionar a opção que tem o nome, depois um ponto, seguido do número do quadro e finalmente a extensão do arquivo.
Assim que todos estes atributos de renderização forem configurados, você deve voltar a aba Output
e configurar o Frame Range para All Frames (todos os quadros).
Com isso feito, salve incrementalmente e depois clique em Render to Picture Viewer.
Quando você faz isso, a janela do Picture Viewer abre e você pode visualizar os quadros conforme eles terminam a renderização,
mas eles também serão salvos na localização que você configurou na aba Output.
Assim que a renderização terminar, você pode carregar sua imagem no seu programa de pós-produção
e criar o vídeo final.
Caso você tenha interesse em saber mais sobre a renderização multi-pass (múltiplos passos/camadas),
comece o próximo vídeo da série.